
Set up your team workspace
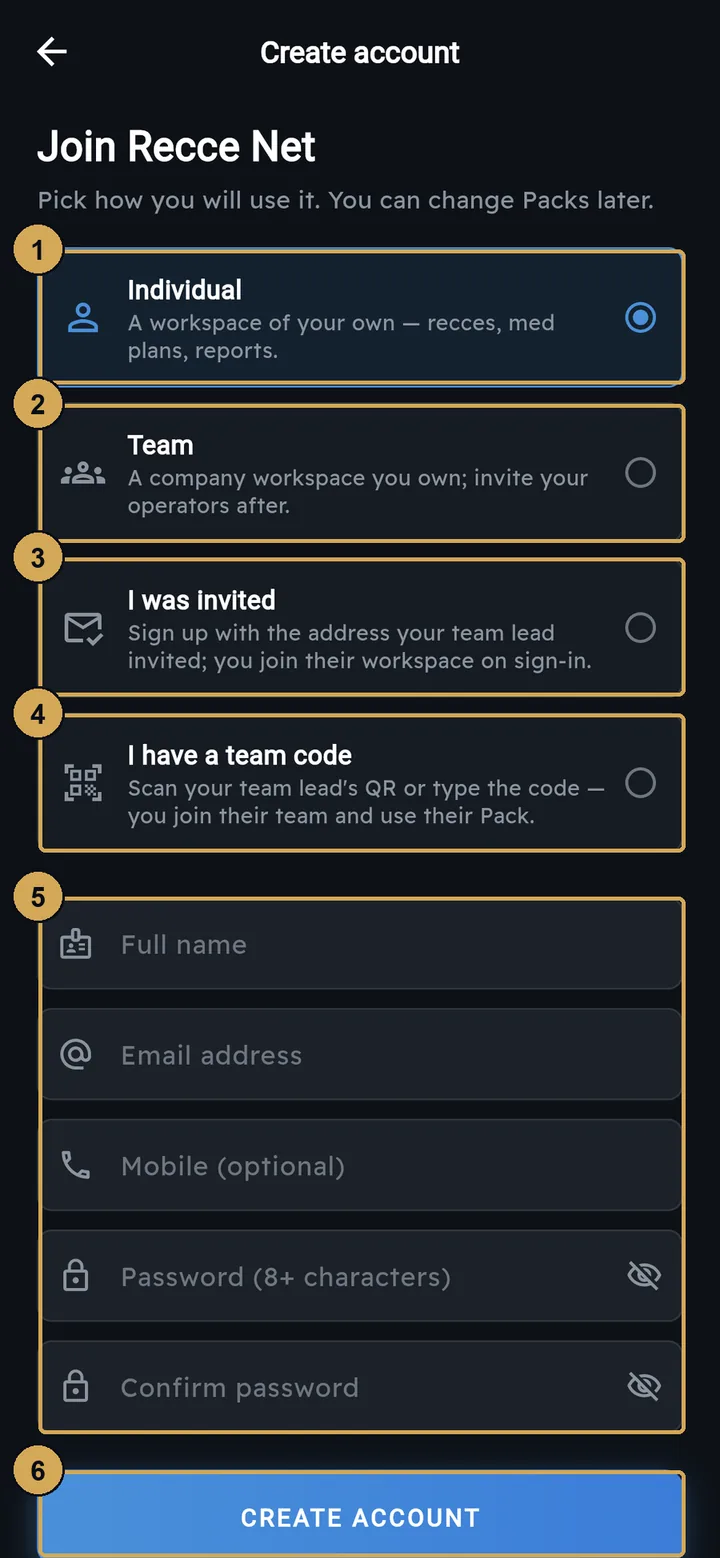
The team lead signs up in the app, or at app.reccenet.com, and chooses Team. This creates a company workspace that you own. You then choose a Team Pack and manage it from the console at admin.reccenet.com. Operators joining you choose Invited by email or I have a team code.
 (opens the full-size screenshot)
Team leads pick Team. Operators pick “Invited by email” or “I have a team code”.
- 1: Individual – a workspace of your own
- 2: Team – a company workspace you own
- 3: Invited by email – join your team lead’s workspace
- 4: Have a team code – scan the QR or type the code
- 5: Your details and password
- 6: Create account
Join codes
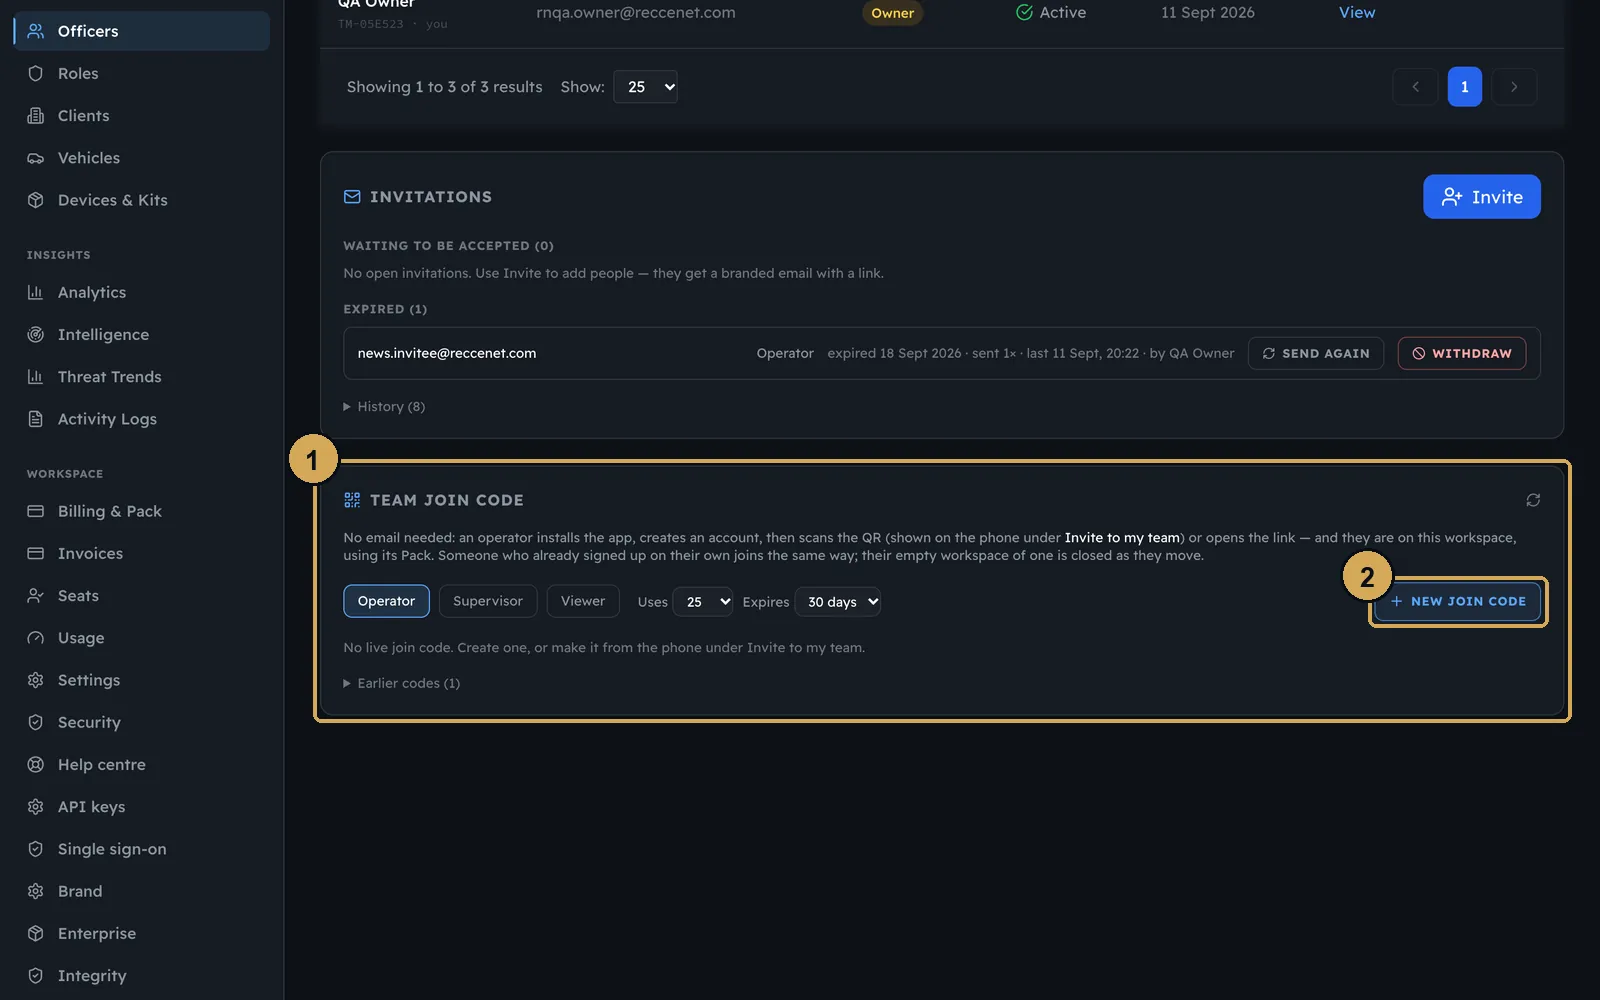
A join code (RN-XXXX-XXXX) puts someone straight into your workspace on your Pack. Create one in the console under Officers, choosing the role, how many people can use it and when it expires. You can also create one in the app from Invite to my team on the dashboard. The new operator scans the QR code, opens the link or types the code.
 (opens the full-size screenshot)
Make a join code in the console: choose the role, how many uses and when it expires.
- 1: Join code panel
- 2: Make a new code
 (opens the full-size screenshot)
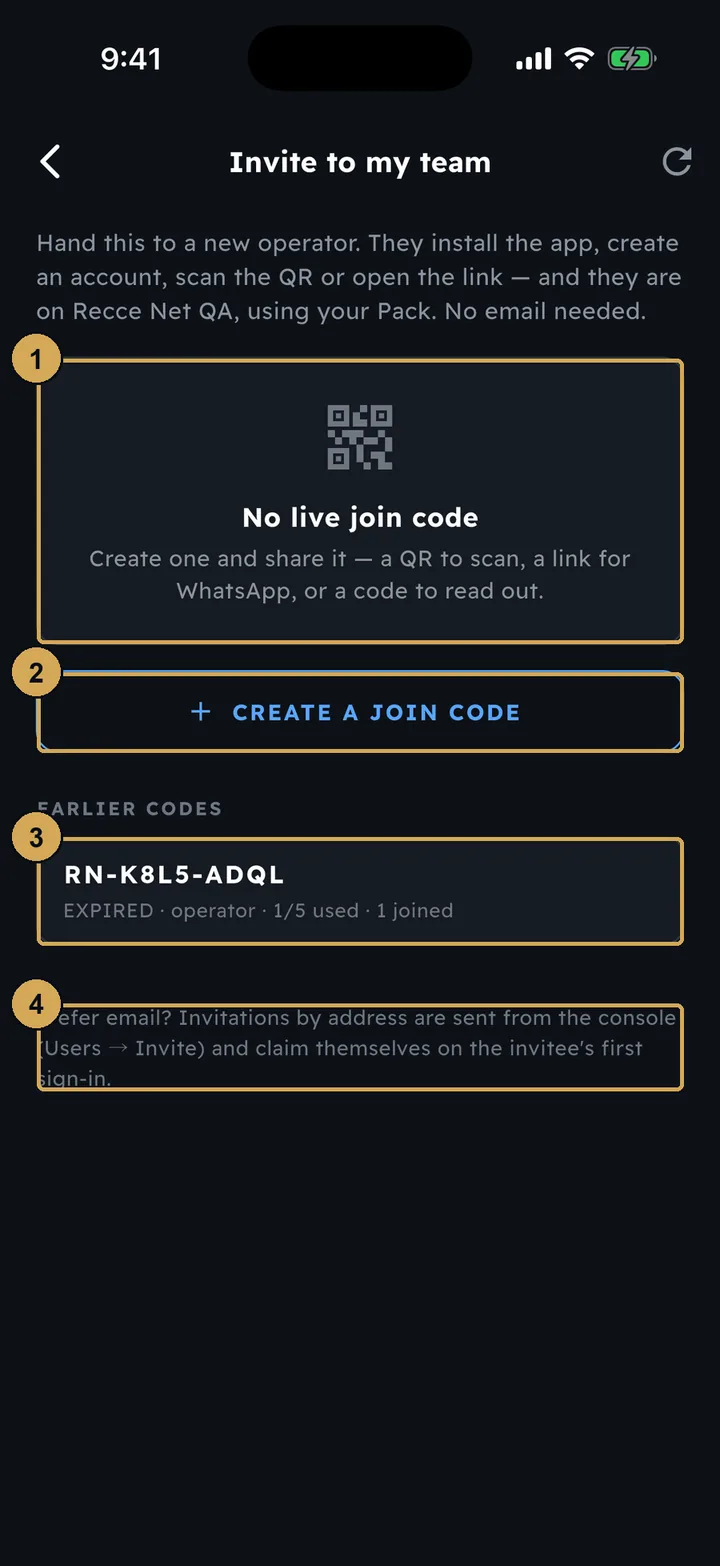
Or make one in the app: the new operator scans the QR or types the code.
- 1: The live join code and QR appear here
- 2: Create a join code
- 3: Earlier codes with how many have joined
- 4: Email invitations are sent from the console
 (opens the full-size screenshot)
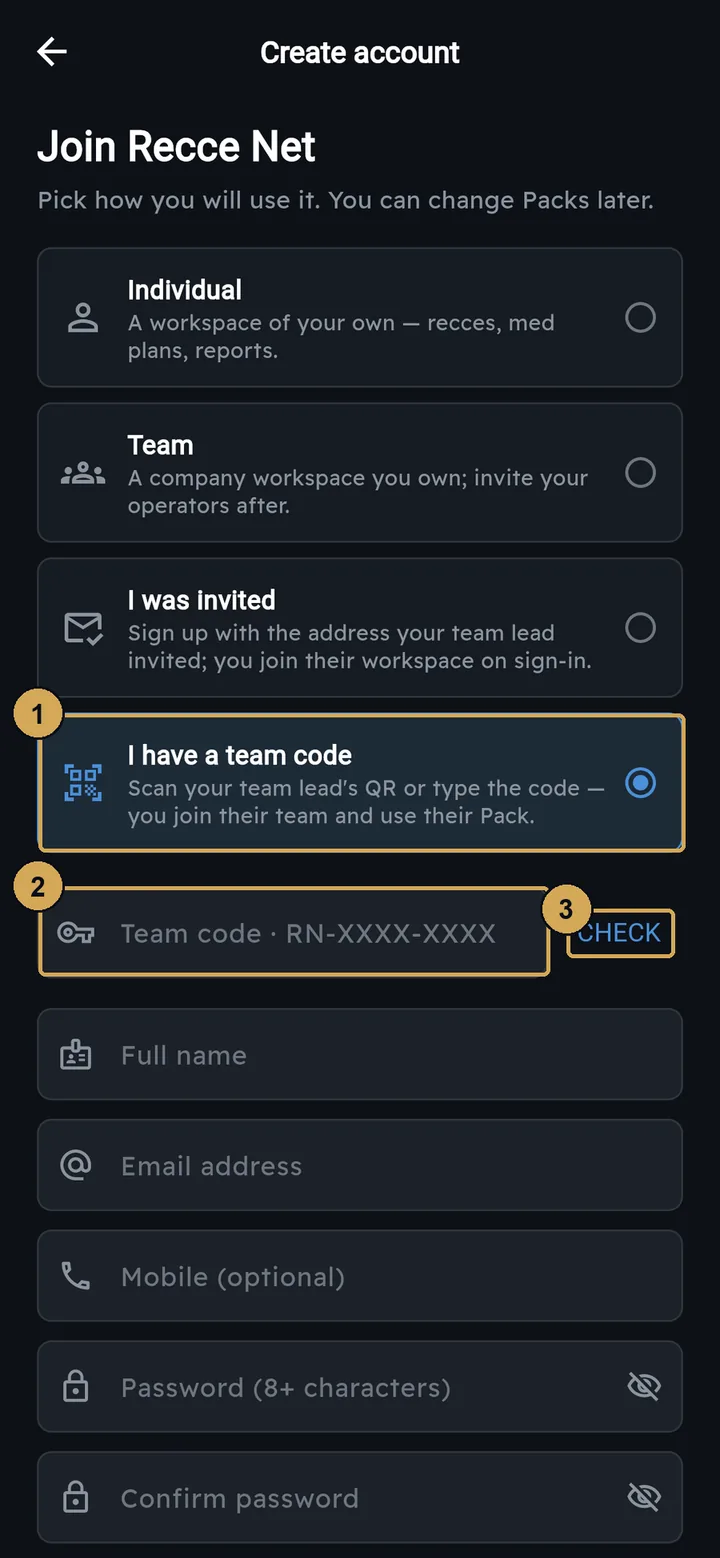
The operator types the code, taps Check and creates their account.
- 1: I have a team code
- 2: Type the RN-XXXX-XXXX code
- 3: Check the code
Roles and invites
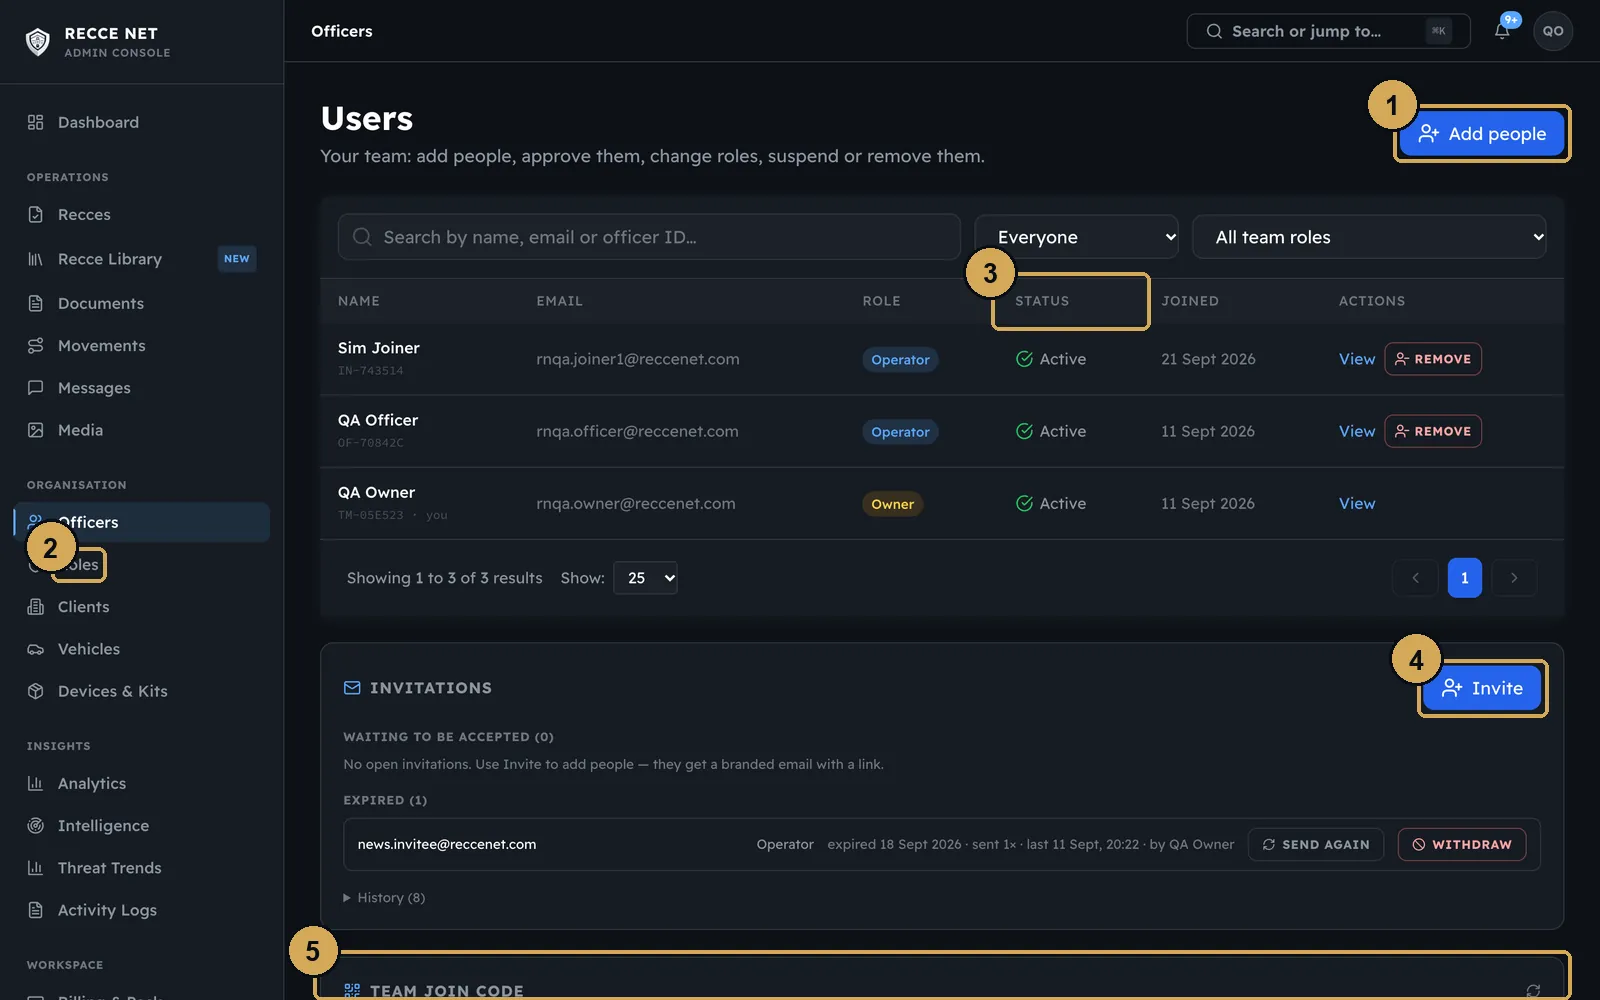
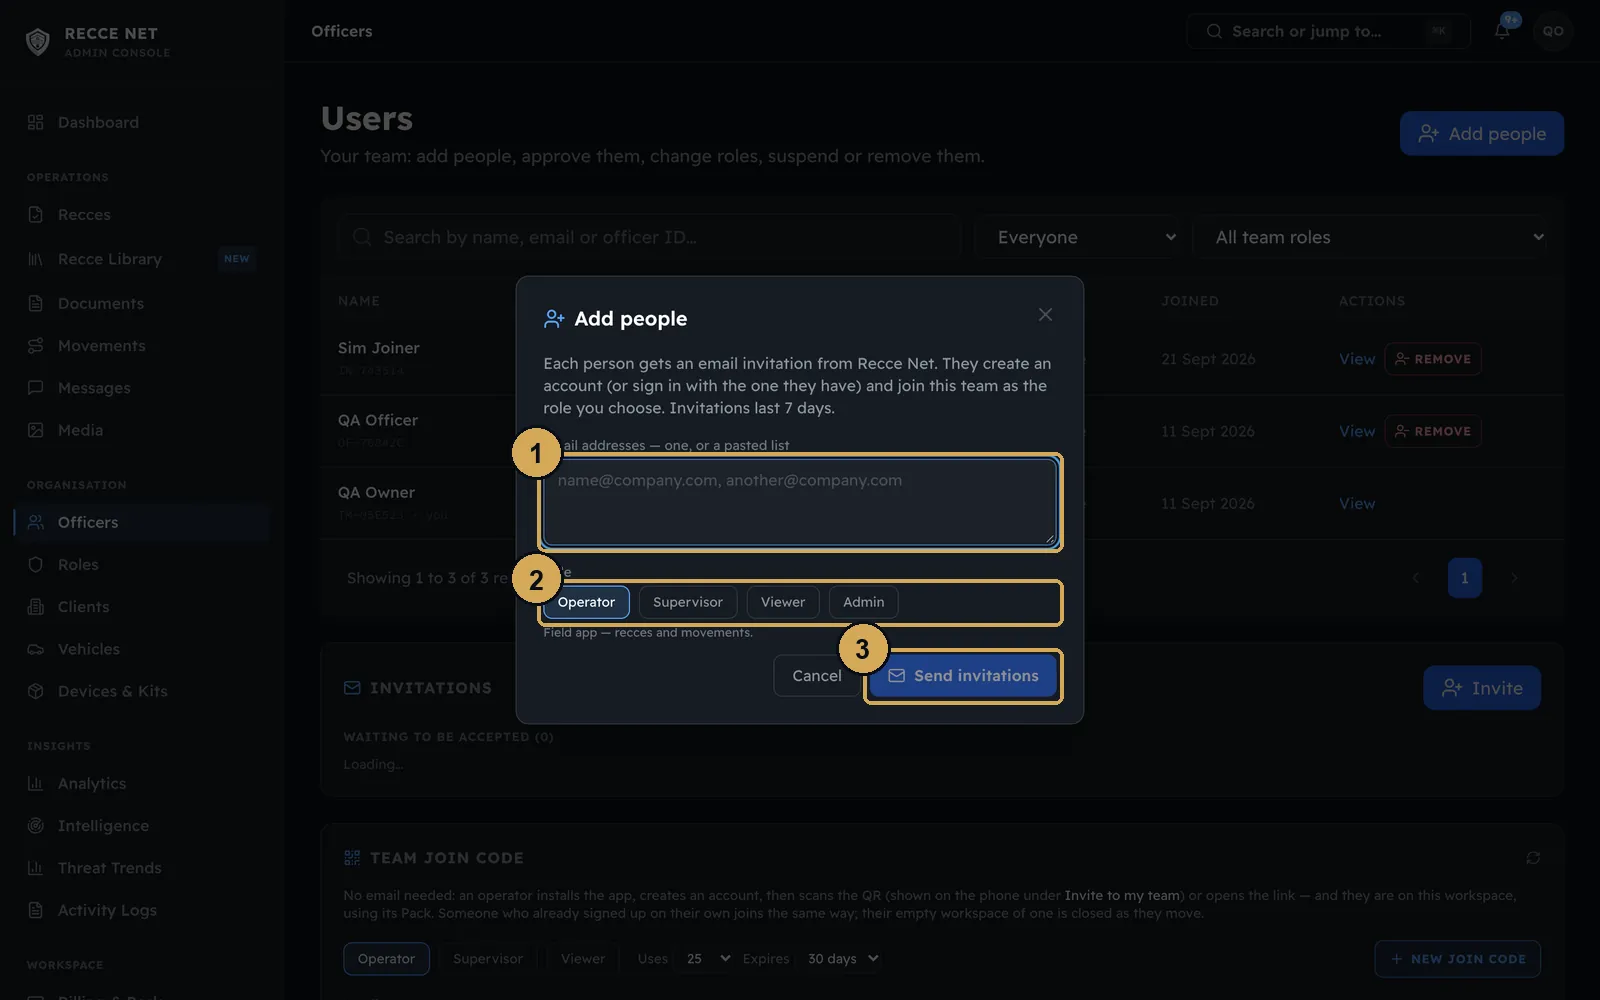
Officers in the console lists everyone in the workspace, with their role, status and the date they joined. Below the list are the invitations and the join code. To invite by email, enter one address or paste a list, and choose the role they join as. Each person gets a branded email with a link.
 (opens the full-size screenshot)
Officers: everyone in the workspace, with invitations and the join code underneath.
- 1: Add people
- 2: Workspace role
- 3: Status
- 4: Invite by email
- 5: Team join code
 (opens the full-size screenshot)
Invite by email: one address or a pasted list, and the role they join as.
- 1: One email or a pasted list
- 2: Role they join as
- 3: Sends a branded email
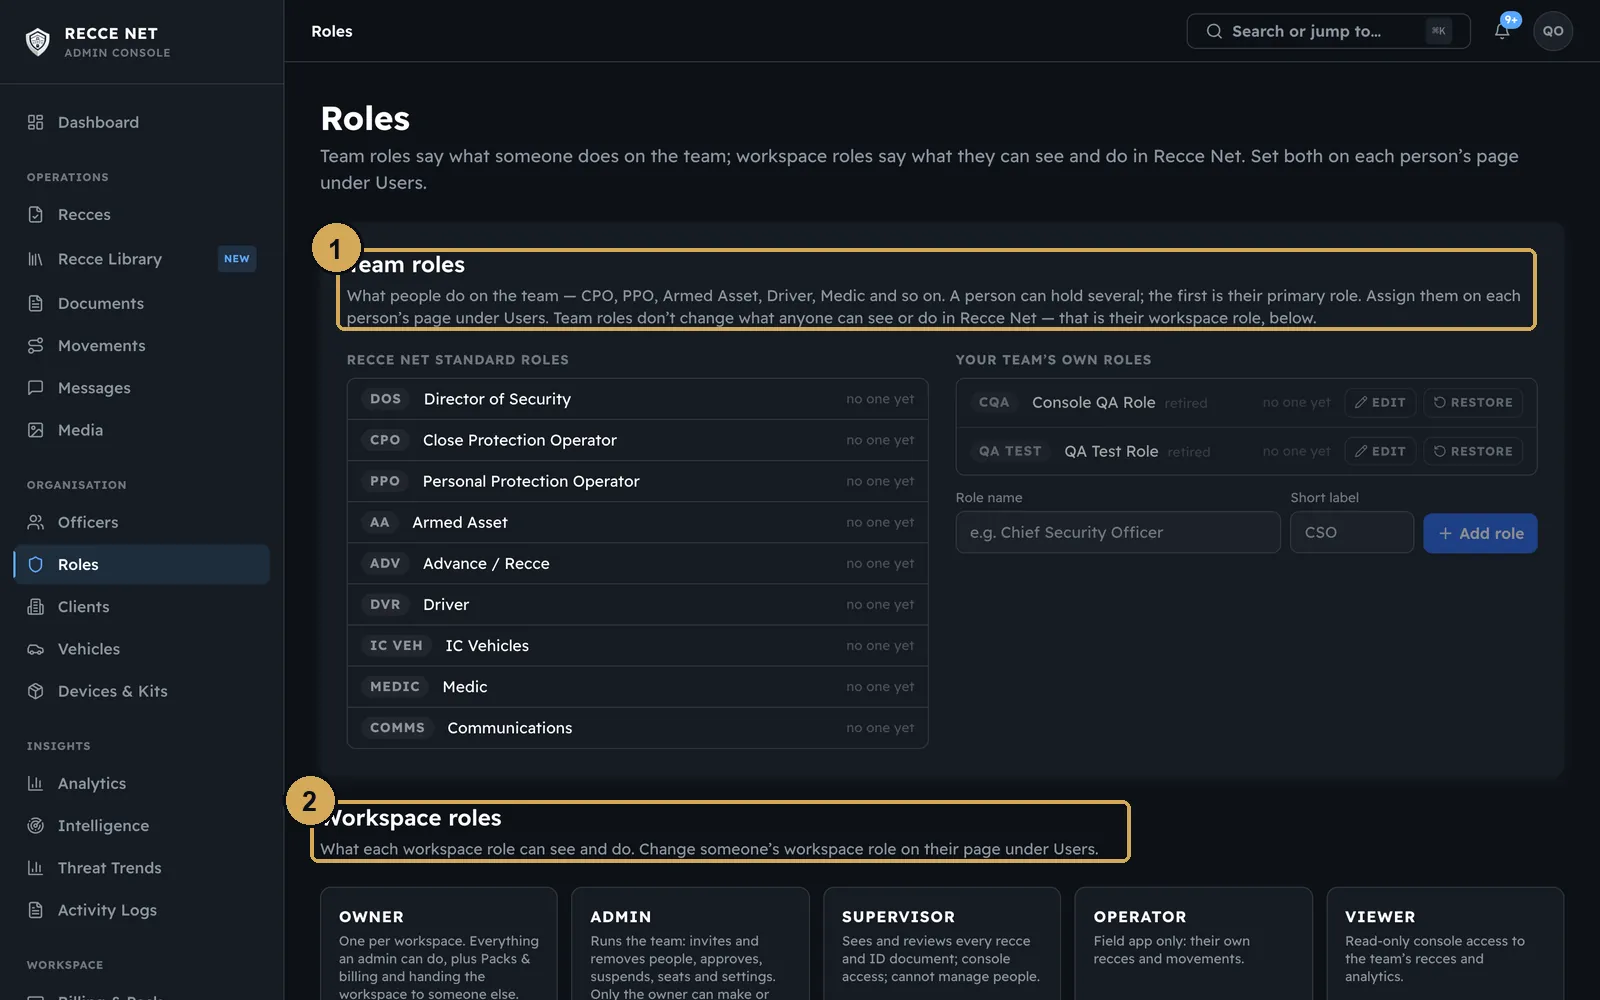
There are two kinds of role:
- Workspace roles set what someone can do in Recce Net, for example owner, supervisor or operator.
- Team roles are the jobs people do on the ground, such as DOS, Advance, PPO or Medic. You can add your own.
 (opens the full-size screenshot)
Team roles are the jobs people do; workspace roles set what they can do in Recce Net.
- 1: Team roles
- 2: Workspace roles
One officer, and identity checks
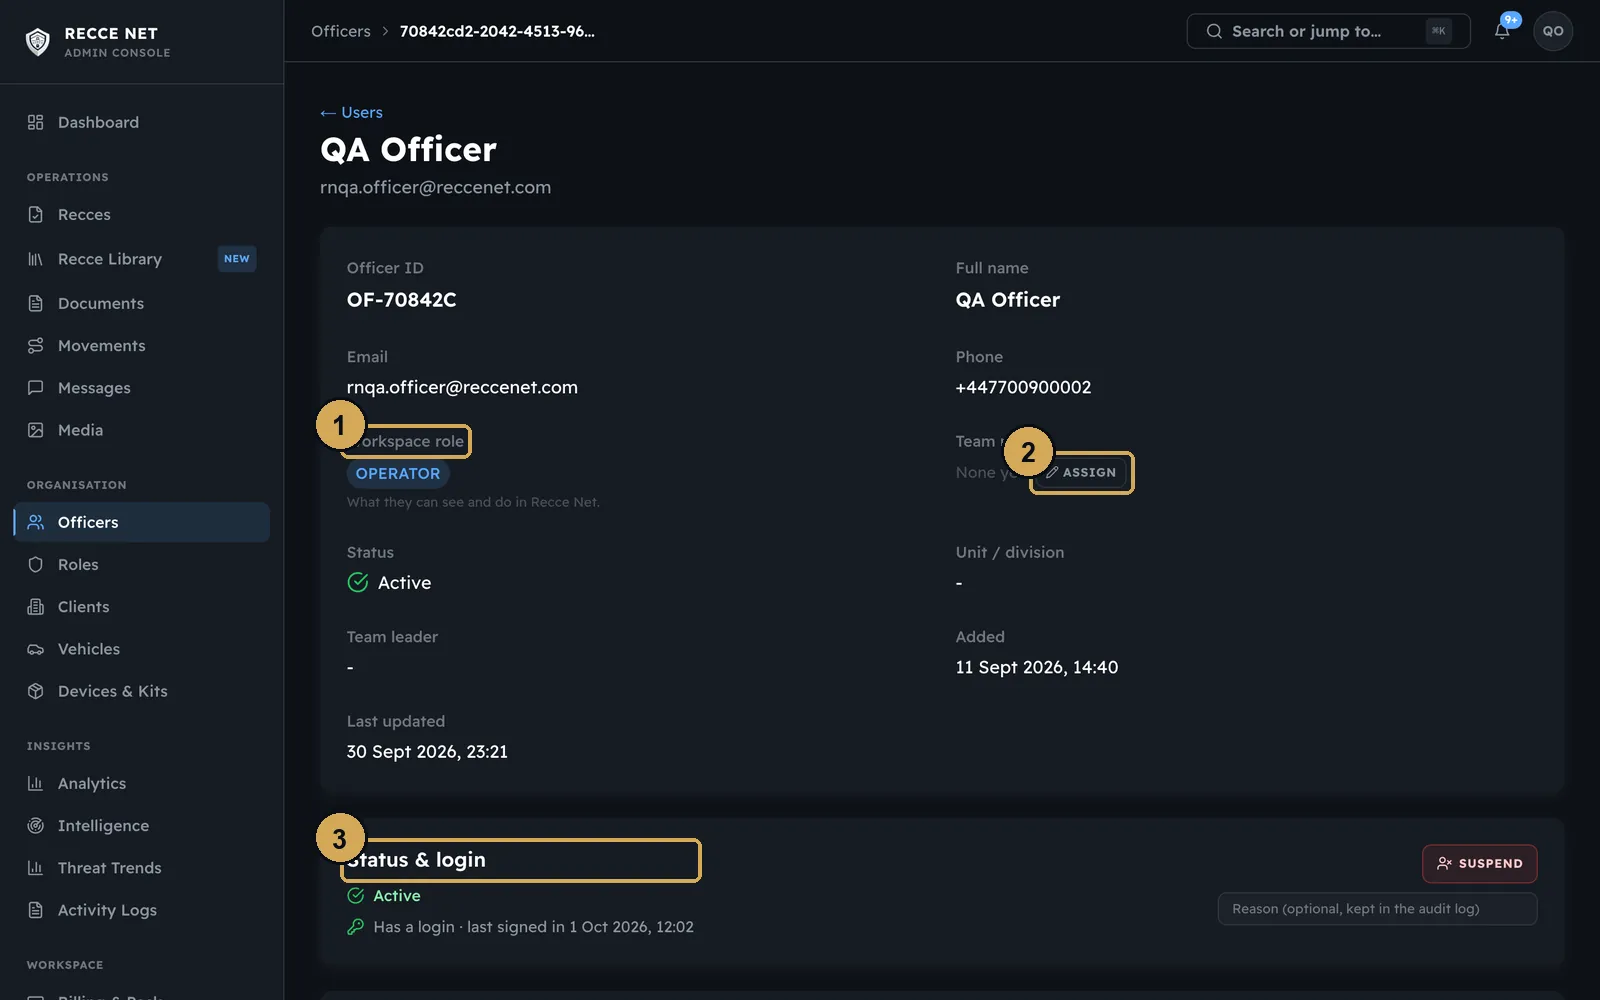
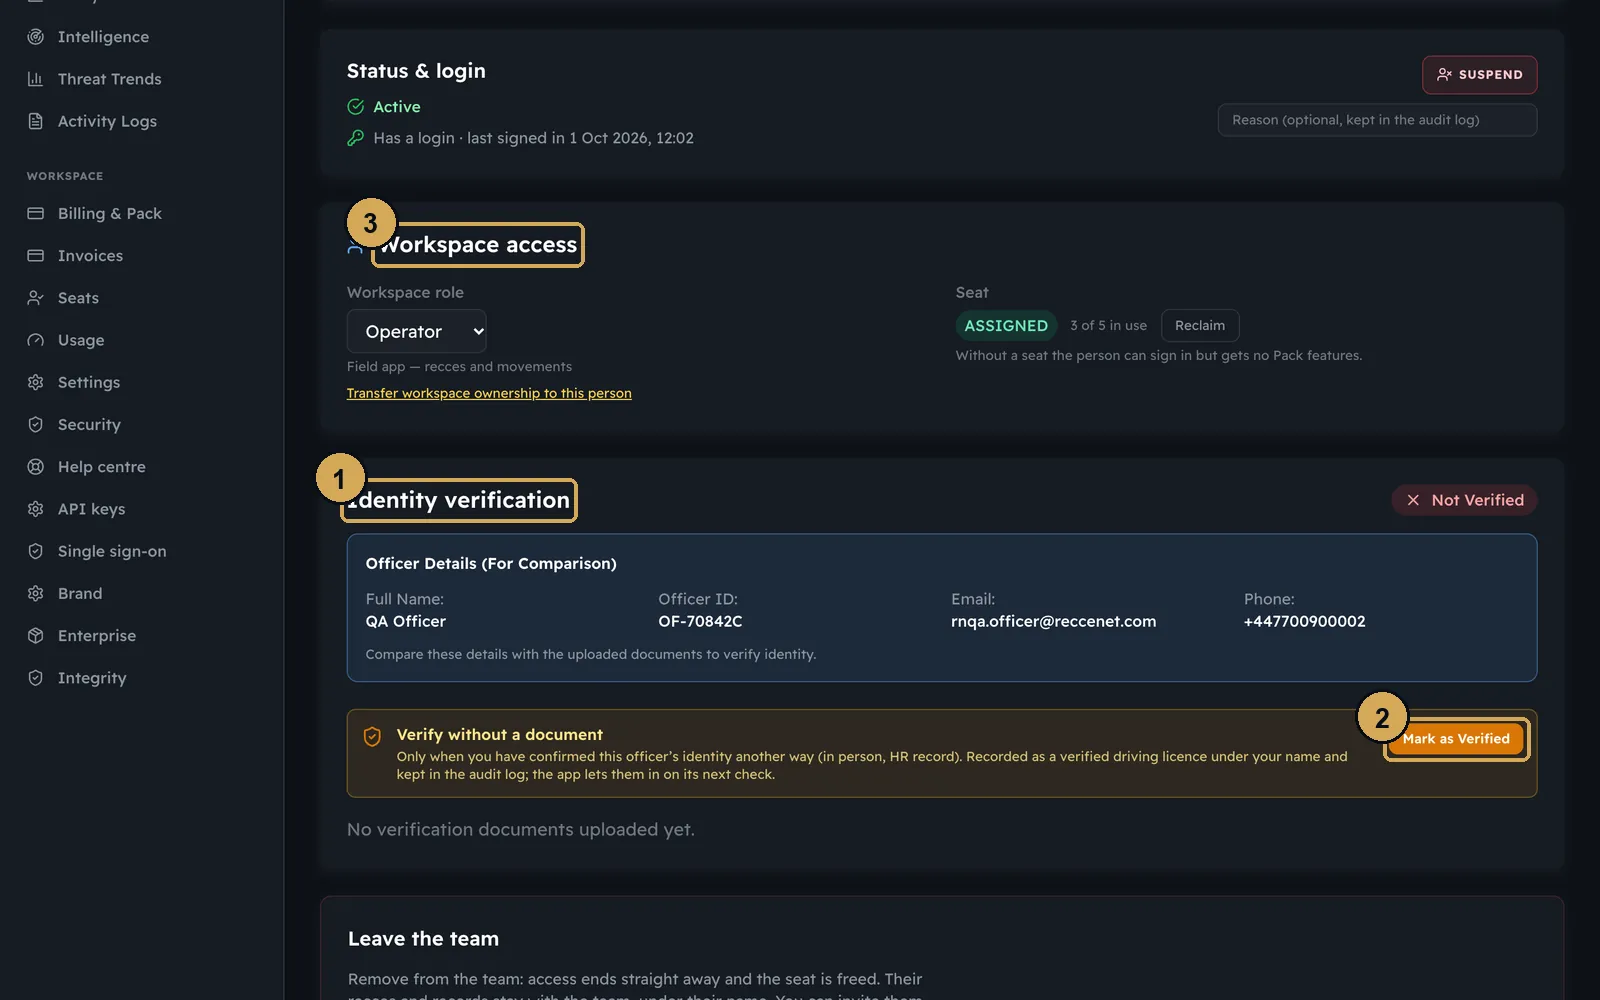
Open anyone in the list to change their roles, see their status and login, or suspend them. Operators upload their driving licence from the app when they join. Compare it with their details, then mark them as verified.
 (opens the full-size screenshot)
One officer: their roles, status and login. Suspend someone from here.
- 1: Workspace role
- 2: Team roles
- 3: Status and login (suspend here)
 (opens the full-size screenshot)
Check the uploaded ID against their details, then mark them as verified.
- 1: Identity verification
- 2: Mark as verified
- 3: Seat and access
Seats and Packs
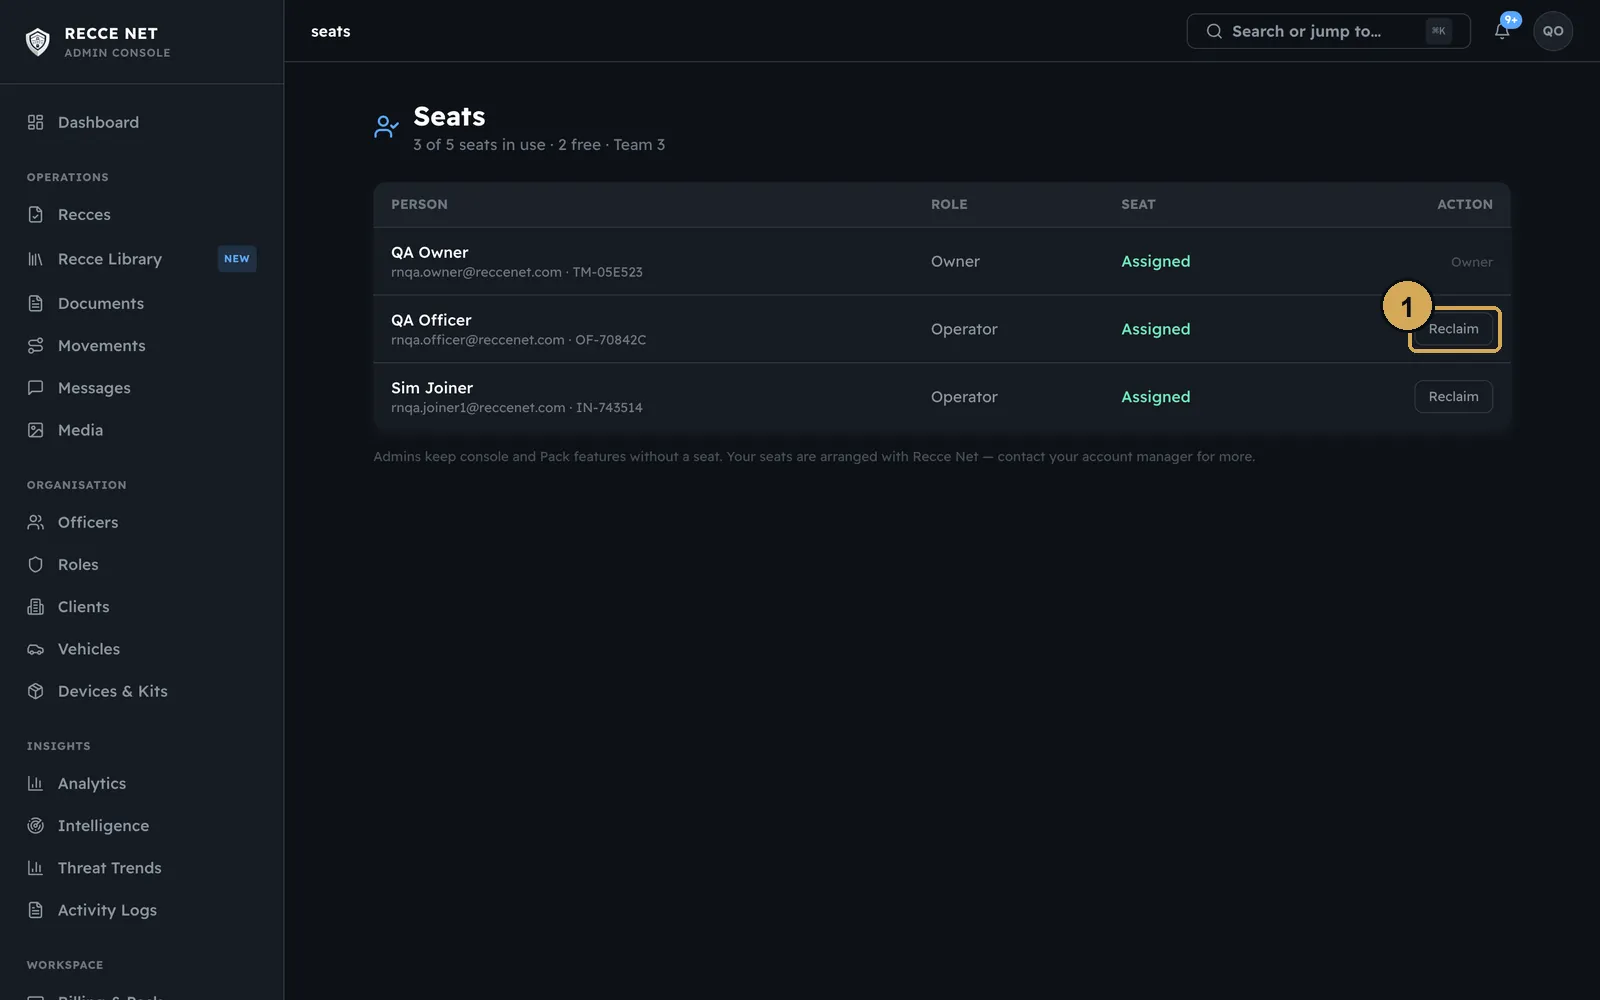
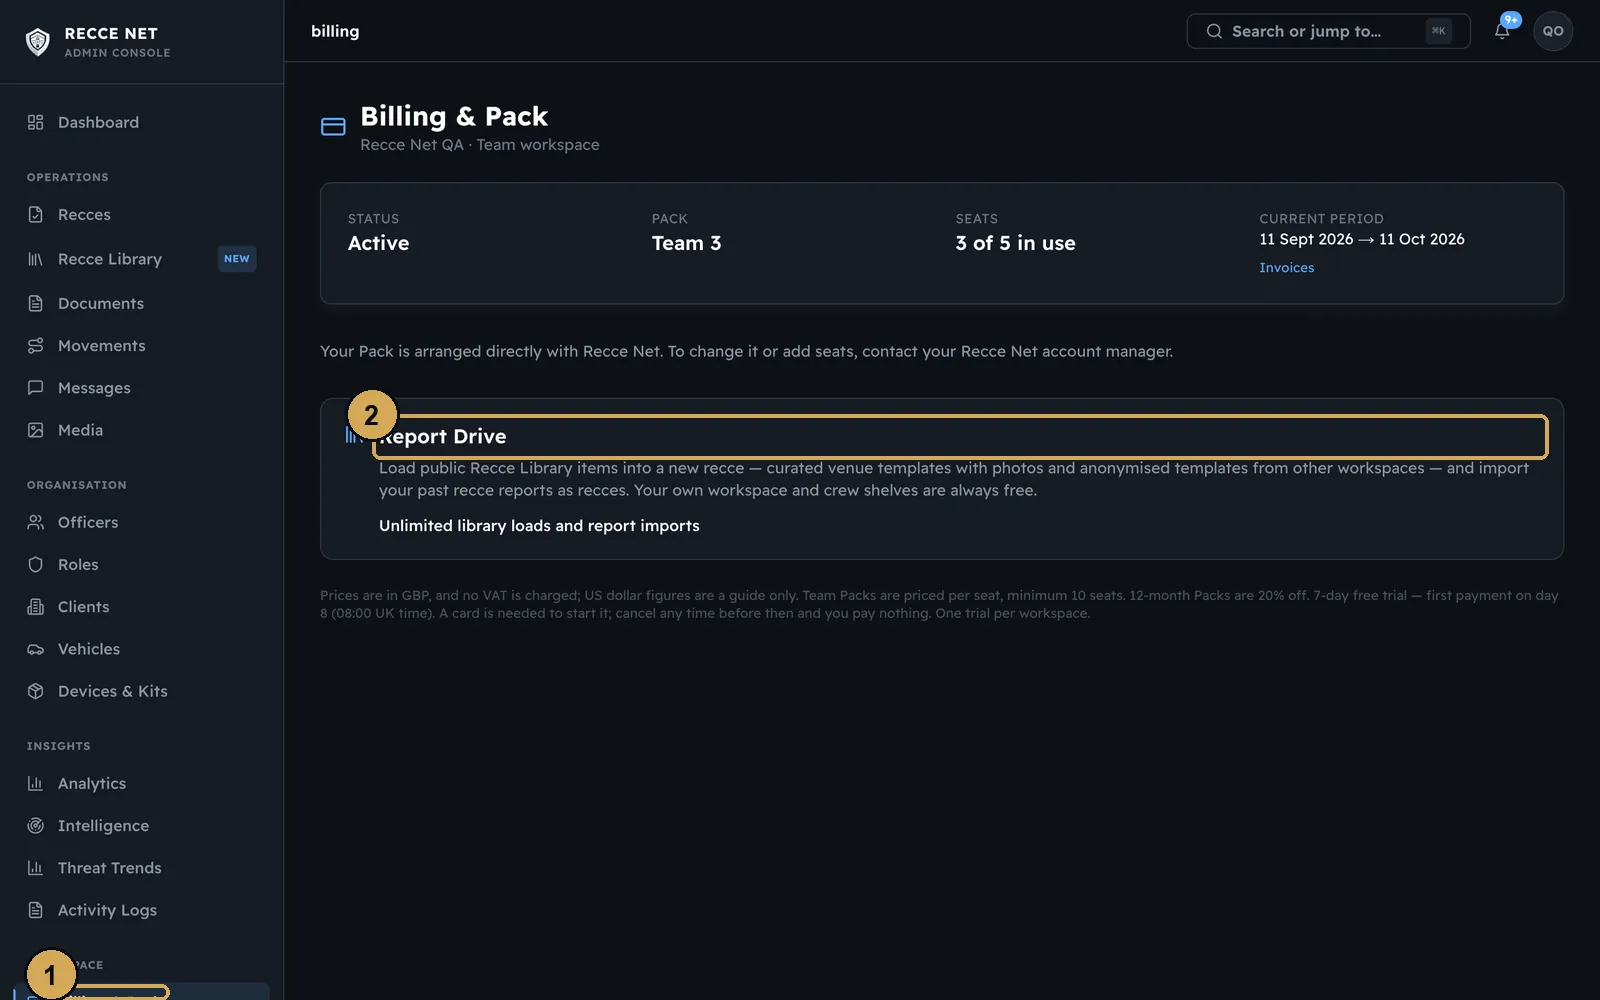
Team Packs are priced per seat, with a minimum of 10 seats. A seat is one person who can use the Pack’s features. Seats shows who holds each one. You can reclaim a seat and give it to someone else at any time. Billing shows your Pack, seats and allowance, and the Report Drive add-on. Compare the Packs on the pricing page.
 (opens the full-size screenshot)
Who holds a seat. Reclaim one and give it to someone else at any time.
- 1: Reclaim a seat
 (opens the full-size screenshot)
Your Team Pack, seats and allowance, and the Report Drive add-on.
- 1: Your Pack
- 2: Report Drive add-on
Daily orders
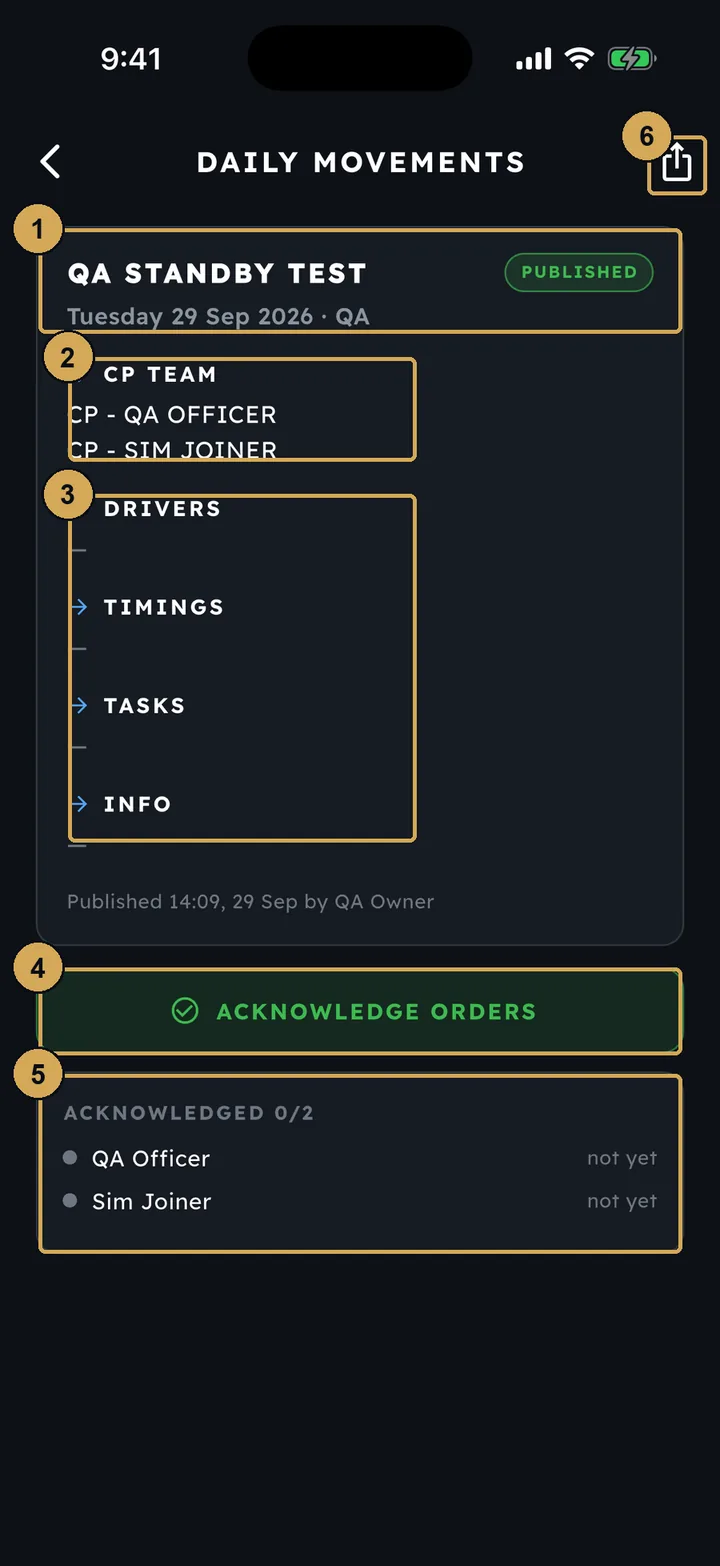
The team lead writes the day’s orders: who is on the team, the drivers, timings, tasks and other information. Do this from Movements in the app with New Orders, or from the console. The orders reach every operator’s phone, and each person taps Acknowledge. You can see who has acknowledged, order by order.
 (opens the full-size screenshot)
A daily order on an operator’s phone, with the Acknowledge button.
- 1: The order, its date and status
- 2: Who is on the team
- 3: Drivers, timings, tasks, info
- 4: Acknowledge the orders
- 5: Who has acknowledged
- 6: Share the orders
 (opens the full-size screenshot)
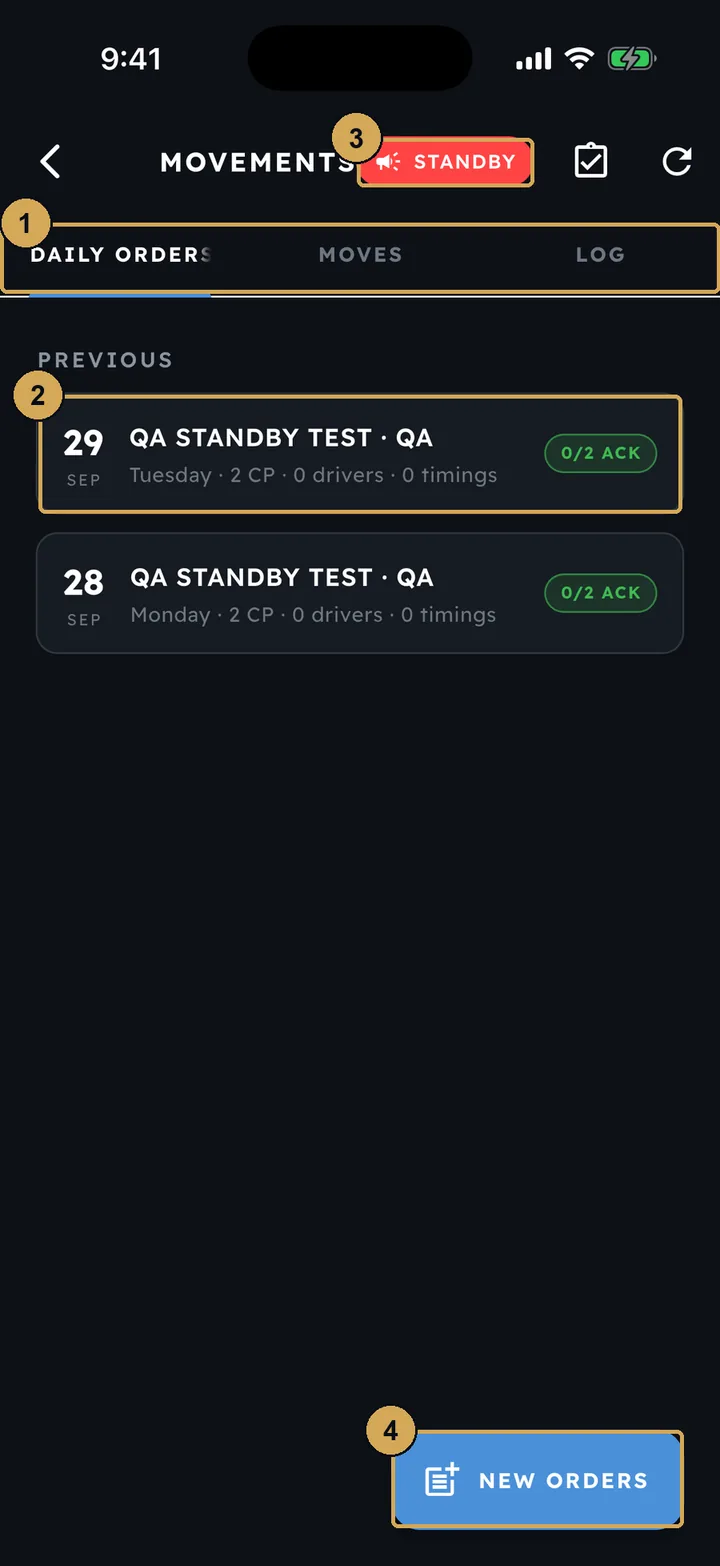
Team leads write new orders and see who has acknowledged, from the Movements screen.
- 1: Daily orders, moves and the log
- 2: A day’s orders and how many have acknowledged
- 3: Send a STANDBY to the team
- 4: Write new daily orders
Movements and movement plans
In the console, Movements holds the planned and called moves for the day, with the daily orders and the acknowledgements. From there you can open the daily log and the end of day report.
 (opens the full-size screenshot)
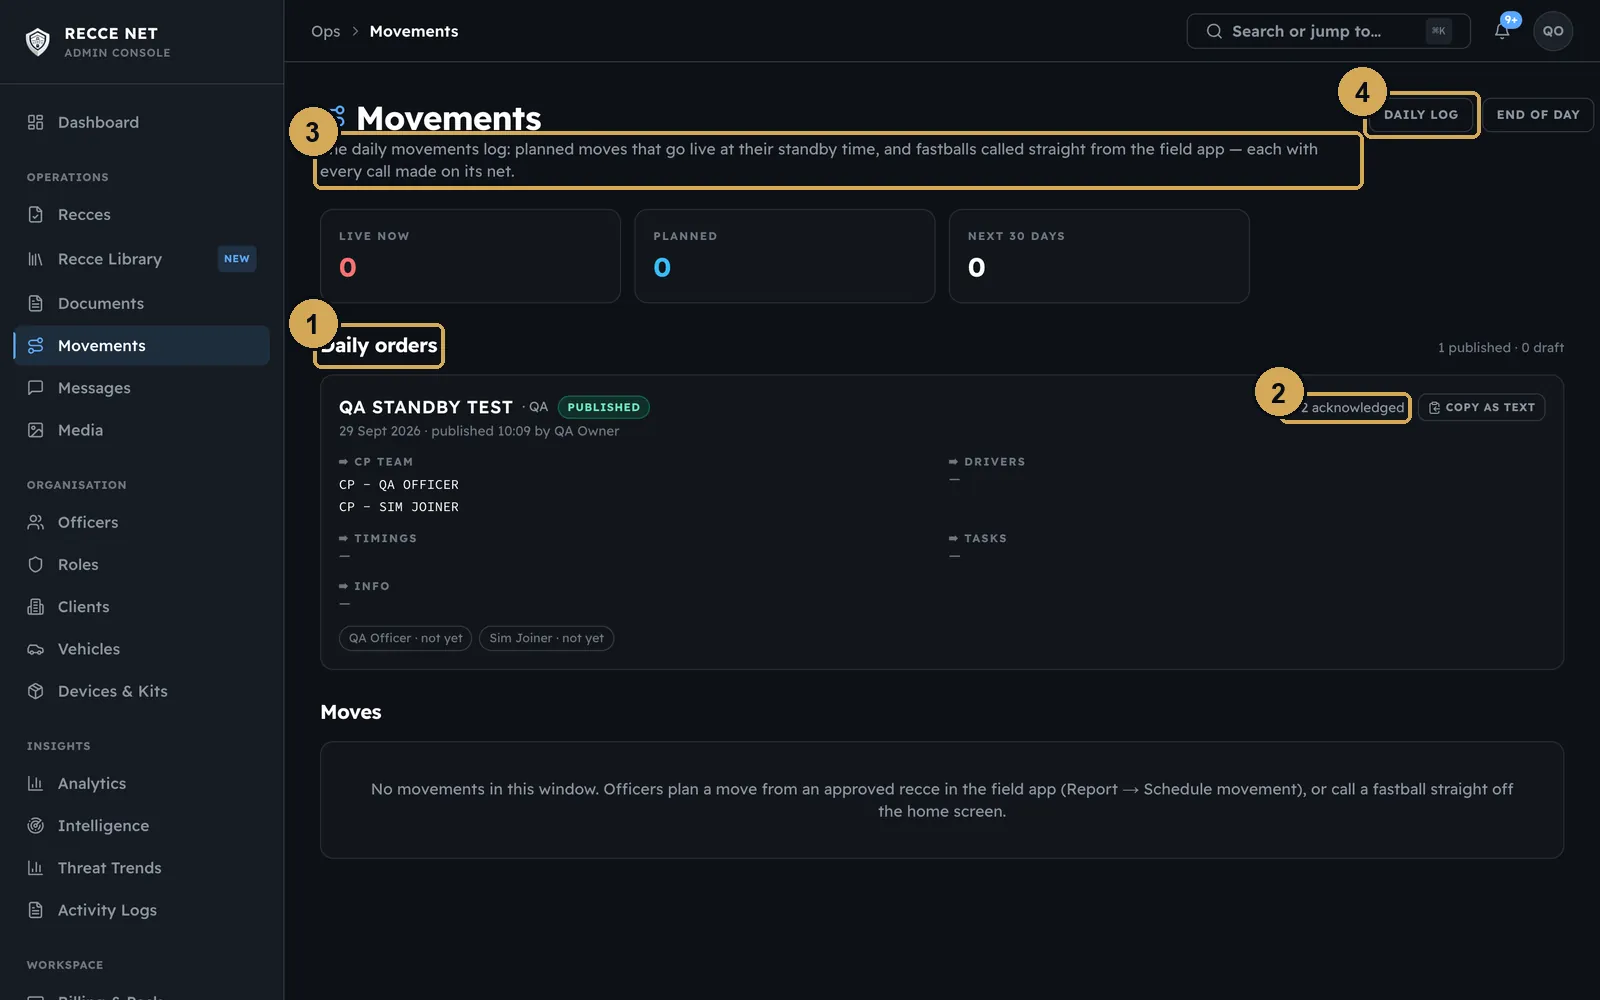
The same orders and moves in the console, with acknowledgements.
- 1: Daily orders
- 2: Acknowledgements
- 3: Planned and called moves
- 4: Daily log and end of day
A movement plan links the start point, convoy, legs and venues of a journey, with a link to every document it uses. Movement plans are kept under Documents in the console, with the country reports and travel briefs.
 (opens the full-size screenshot)
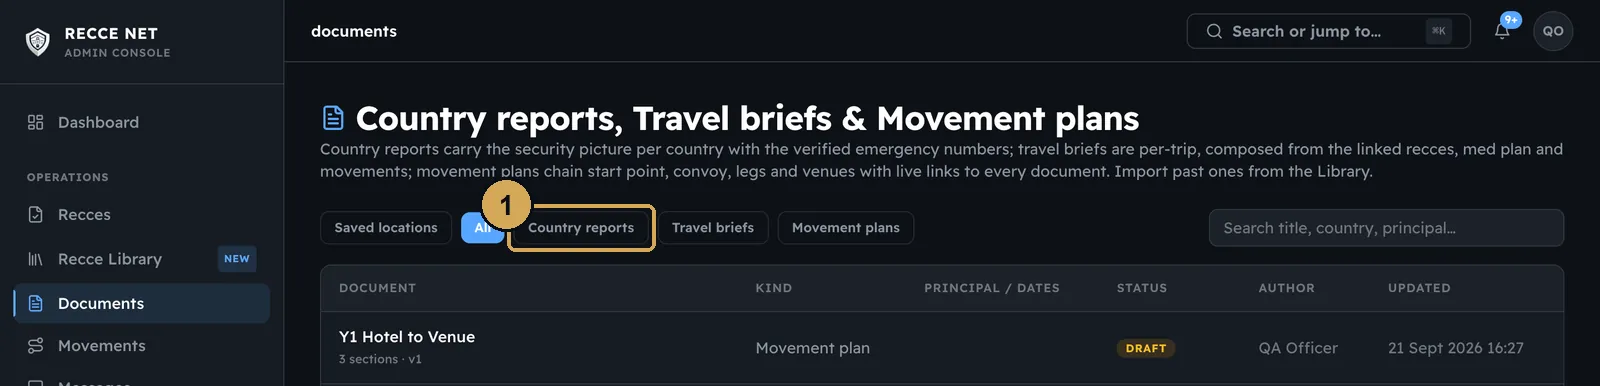
Movement plans live in Documents next to country reports and travel briefs.
- 1: Filter by document type
Compositions
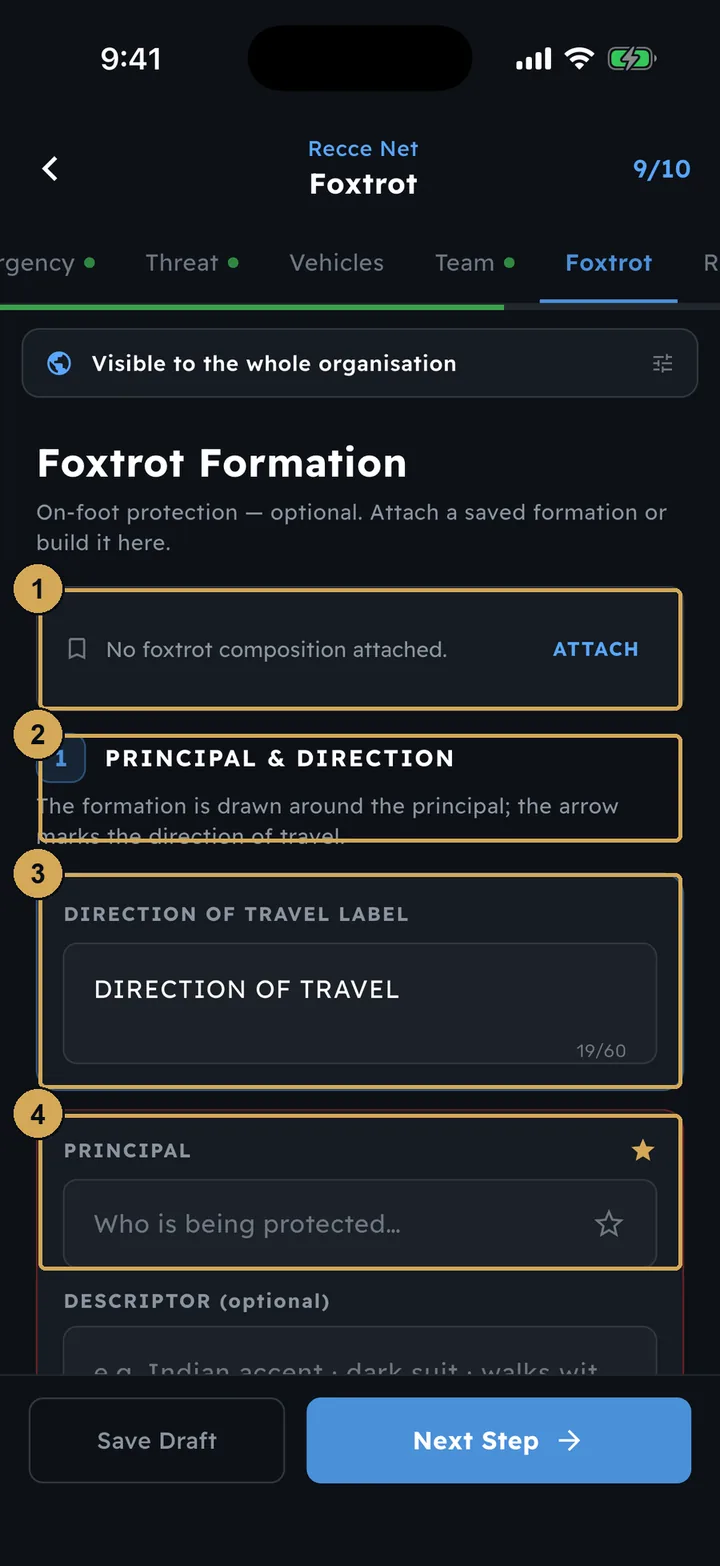
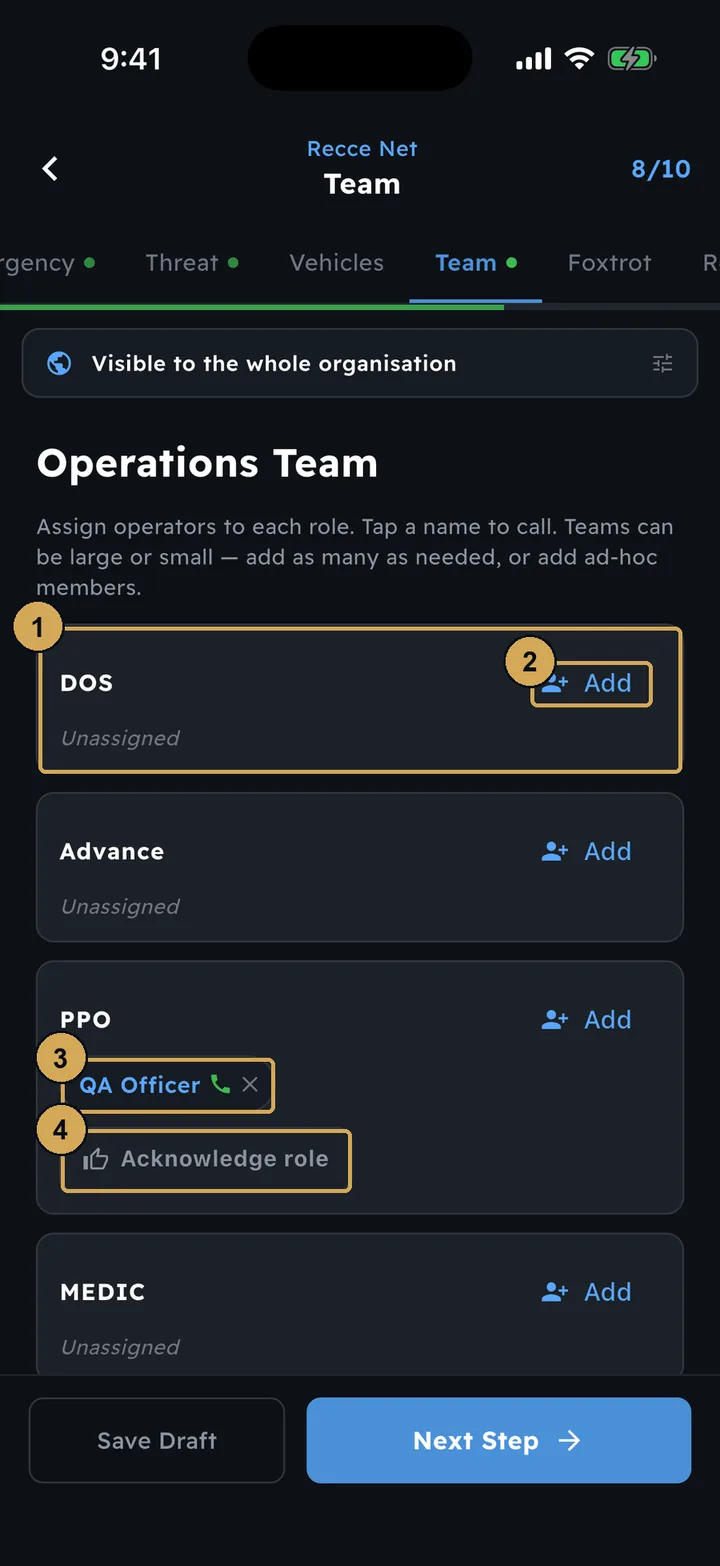
A composition is a line-up you save once and use again. The vehicle composition sets the vehicles and their order for a move. The foxtrot composition sets the on-foot formation around the principal. Build them from the dashboard tiles, then attach them to a recce at step 7 (Vehicles) and step 9 (Foxtrot). At step 8 (Team), give each person a role; they acknowledge it on their own phone.
 (opens the full-size screenshot)
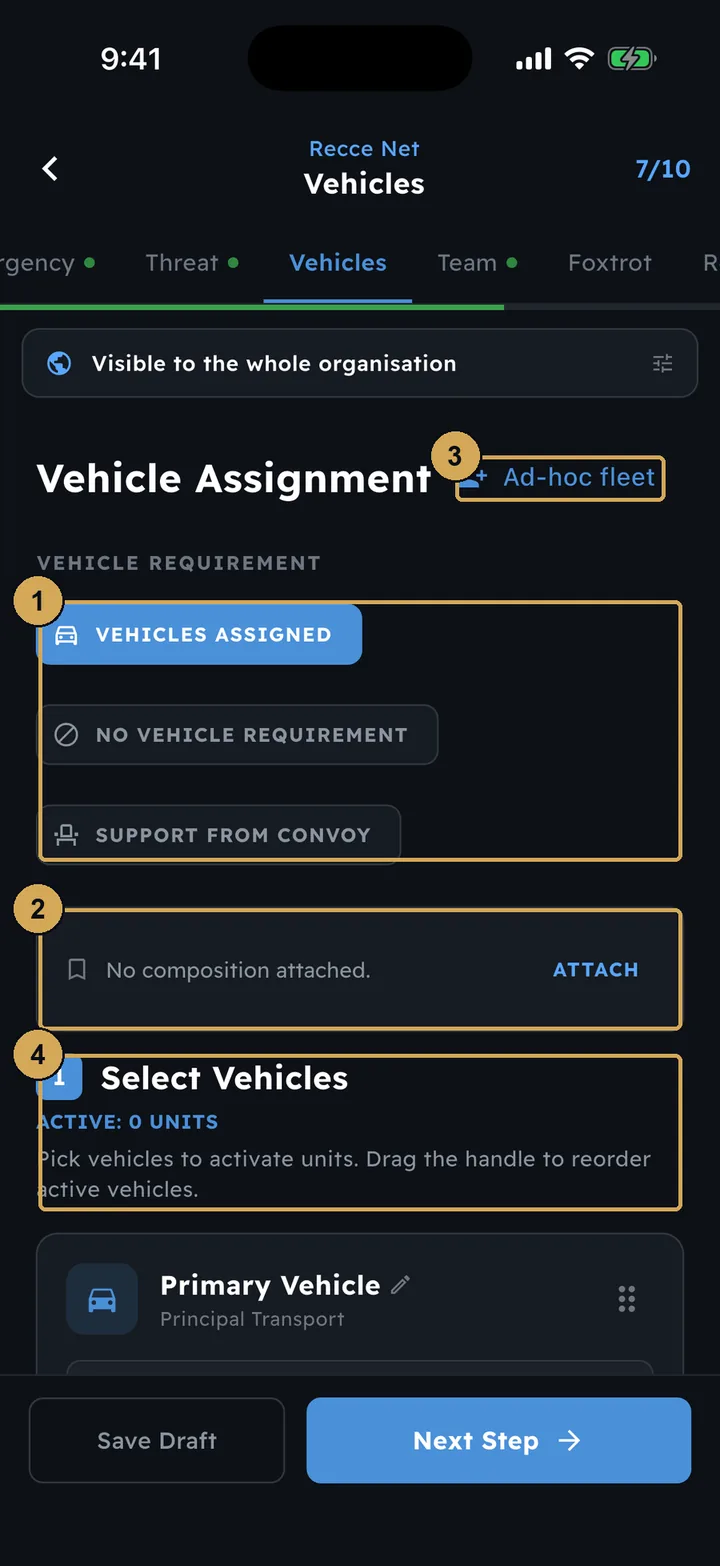
Attach a saved vehicle composition to a recce at step 7.
- 1: Vehicle requirement: assigned, none, or convoy support
- 2: Attach a saved vehicle composition
- 3: Add an ad-hoc fleet
- 4: Select and reorder the vehicles
 (opens the full-size screenshot)
Attach or build a foxtrot formation at step 9.
- 1: Attach a saved foxtrot formation
- 2: Build it here, starting with the principal
- 3: Label the direction of travel
- 4: Who is being protected
 (opens the full-size screenshot)
Assign people to roles on a recce; each one acknowledges on their phone.
- 1: A role on the team
- 2: Add an operator to the role
- 3: Assigned operator – tap to call
- 4: Operator acknowledges the role
STANDBY and the duty team
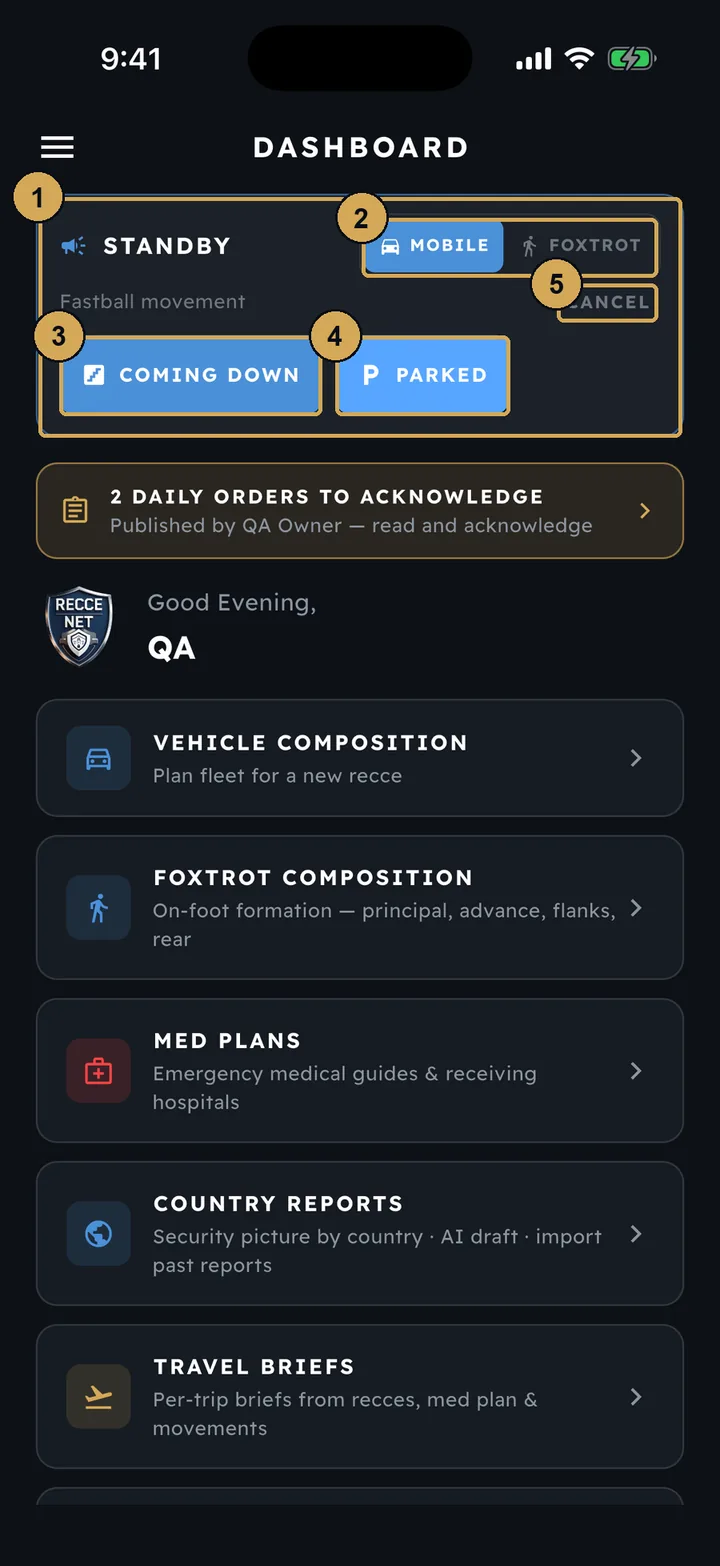
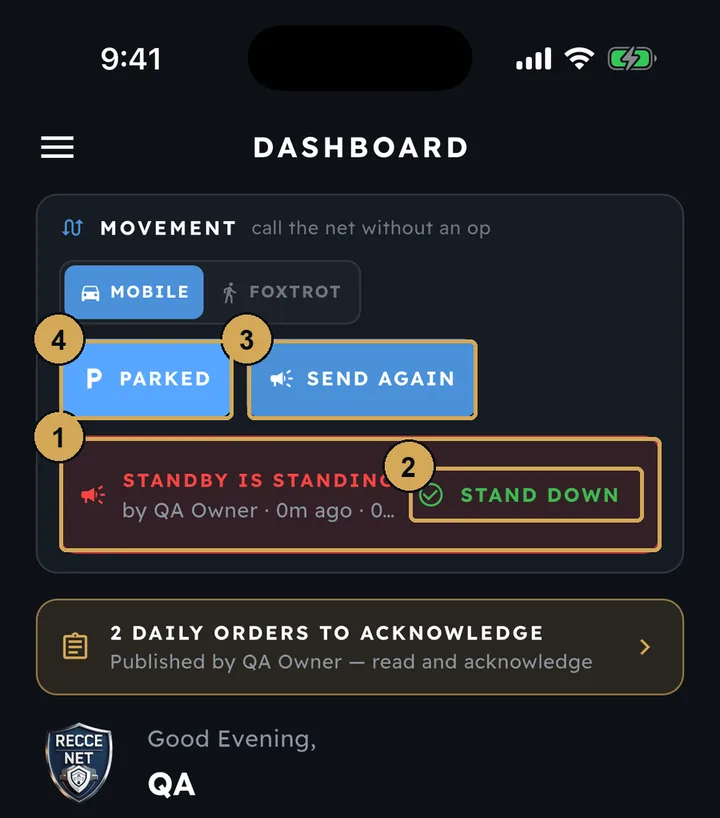
STANDBY on the dashboard tells the team that a move is coming. It is sent the moment you tap it, and everyone on the call gets an alert. The movement card then lets you call Coming Down or Parked, or cancel the call. While a STANDBY is standing, the card shows who called it and when. Stand Down closes the alert on every phone, and Send Again repeats it.
Every call goes into the daily log with its time, its place and who made it. Because STANDBY is sent straight away, don’t practise it on a live team.
 (opens the full-size screenshot)
After STANDBY, the card moves on to Coming Down or Parked, or you cancel the call.
- 1: Movement card now on Standby
- 2: Mobile or Foxtrot movement
- 3: Call Coming Down
- 4: Call Parked
- 5: Cancel the call
 (opens the full-size screenshot)
While a STANDBY stands, Stand Down closes it on every phone.
- 1: Standby is standing – who called it and when
- 2: Stand Down closes everyone’s alert
- 3: Send the standby again
- 4: Call Parked
The duty teamFrom the next app update
A supervisor will be able to switch people on and off duty from a Duty team card. STANDBY will then go to the people on duty by default, so the team that is off duty is not disturbed. You will still be able to send to everyone, or pick people yourself.
Net Messenger
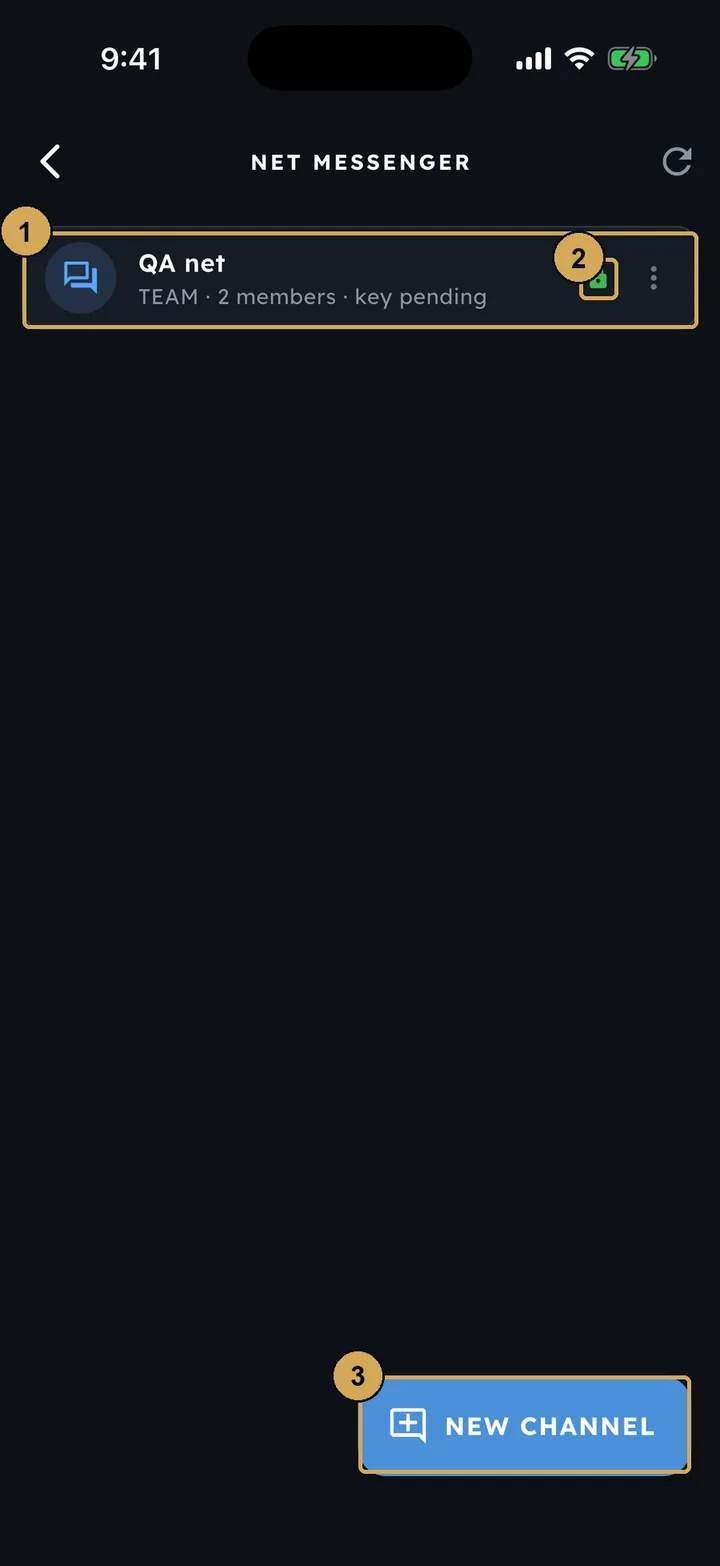
Net Messenger (in the side menu) holds your team’s channels. Every channel is end-to-end encrypted, which the padlock shows. Start a new channel with the button at the bottom.
 (opens the full-size screenshot)
Net Messenger: team channels, end-to-end encrypted.
- 1: A team channel and its members
- 2: End-to-end encrypted
- 3: Start a new channel
The daily log and end of day
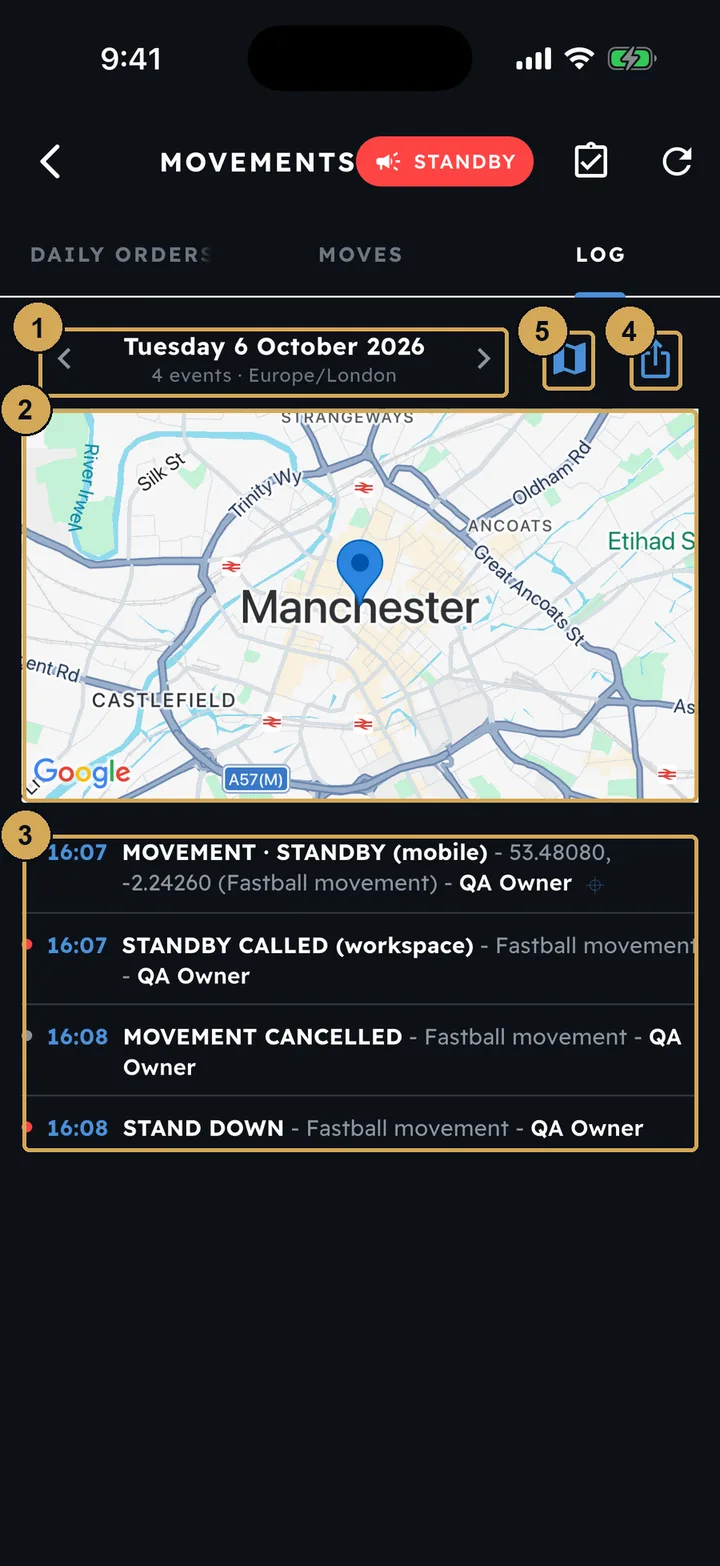
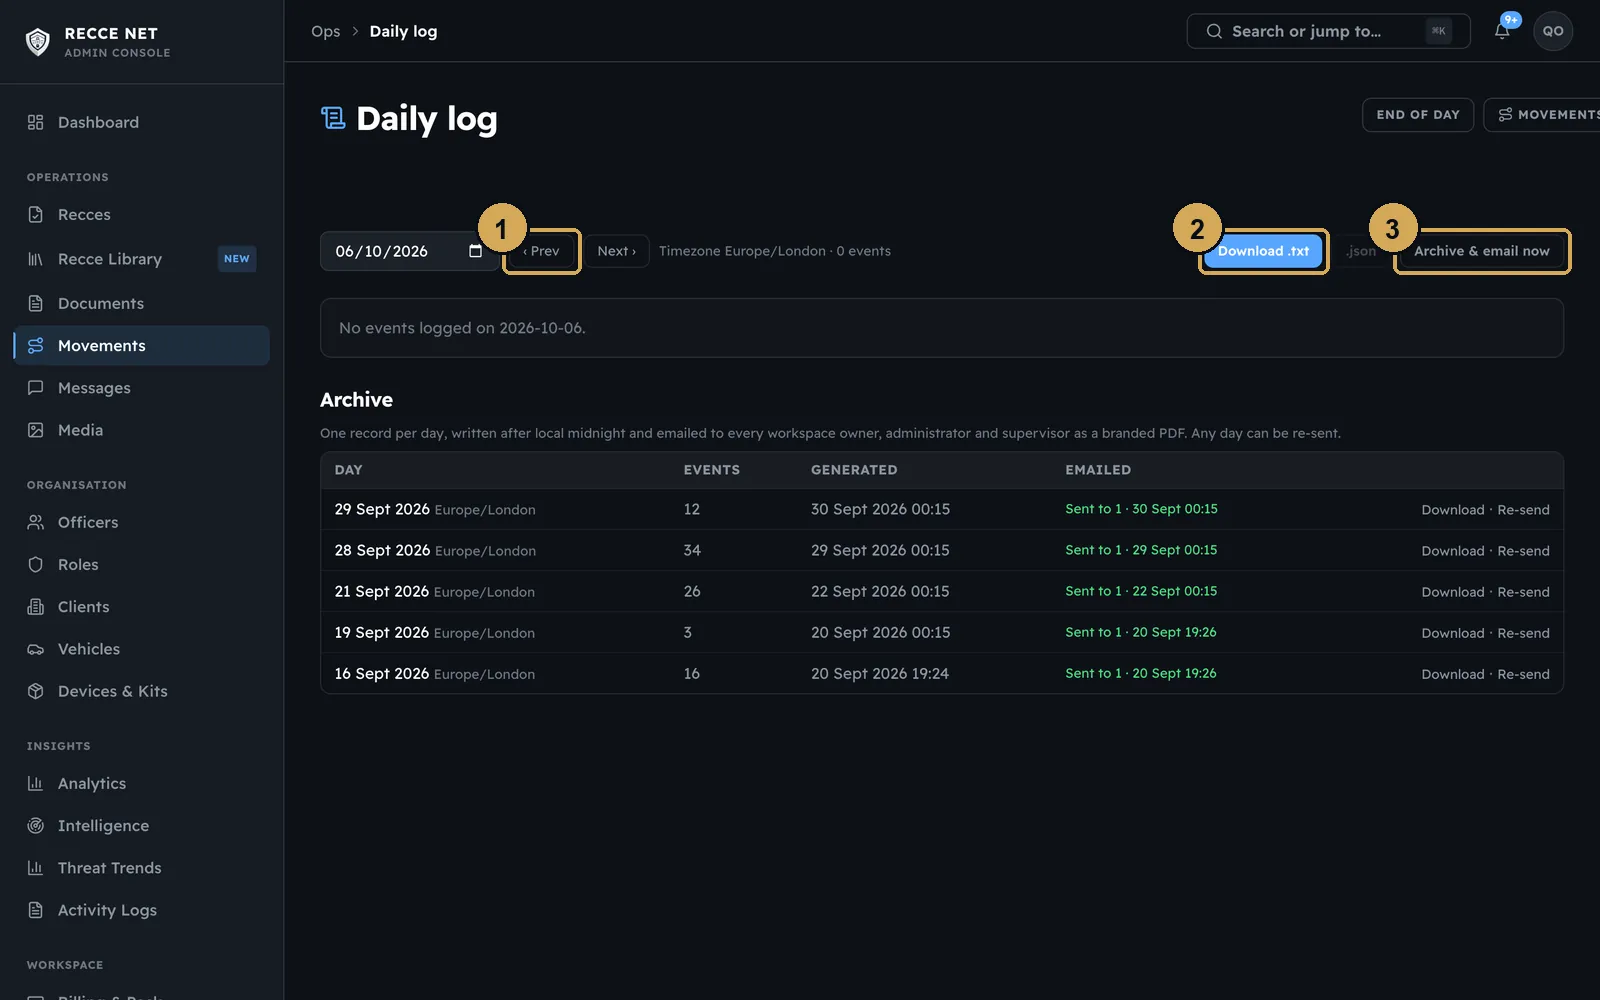
The daily log is written as the day happens. It records every order, STANDBY call, acknowledgement and stand-down, with the time and who made it, and shows each call on a map. Share it from the app, or download it from the console, where past days are kept in the archive. Shortly after midnight in your workspace’s time zone, the day’s log is emailed as a PDF to the workspace’s owners, admins and supervisors.
 (opens the full-size screenshot)
The daily log in the app: every call of the day, with time, place and who made it.
- 1: Pick the day
- 2: Where each call was made
- 3: Each call with time and who made it
- 4: Share the log
- 5: Show calls on the map
 (opens the full-size screenshot)
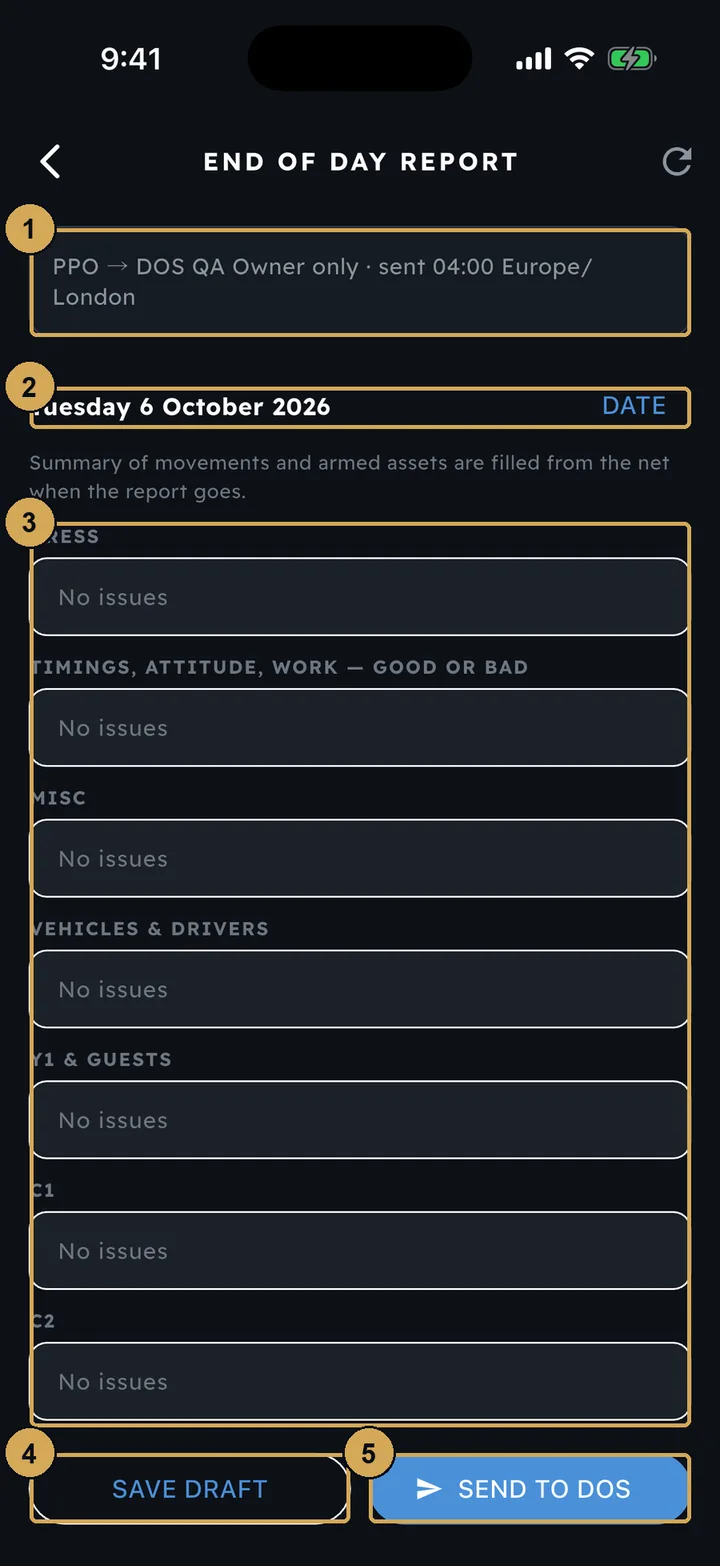
The end of day report, filed from the app. The day’s movements fill themselves in.
- 1: Who receives it and when it is sent
- 2: The report date
- 3: One box per heading – leave ‘No issues’ if nothing to report
- 4: Save a draft
- 5: Send to the DOS
 (opens the full-size screenshot)
The same log in the console, with downloads and the archive.
- 1: Move between days
- 2: Download
- 3: Archive of past days
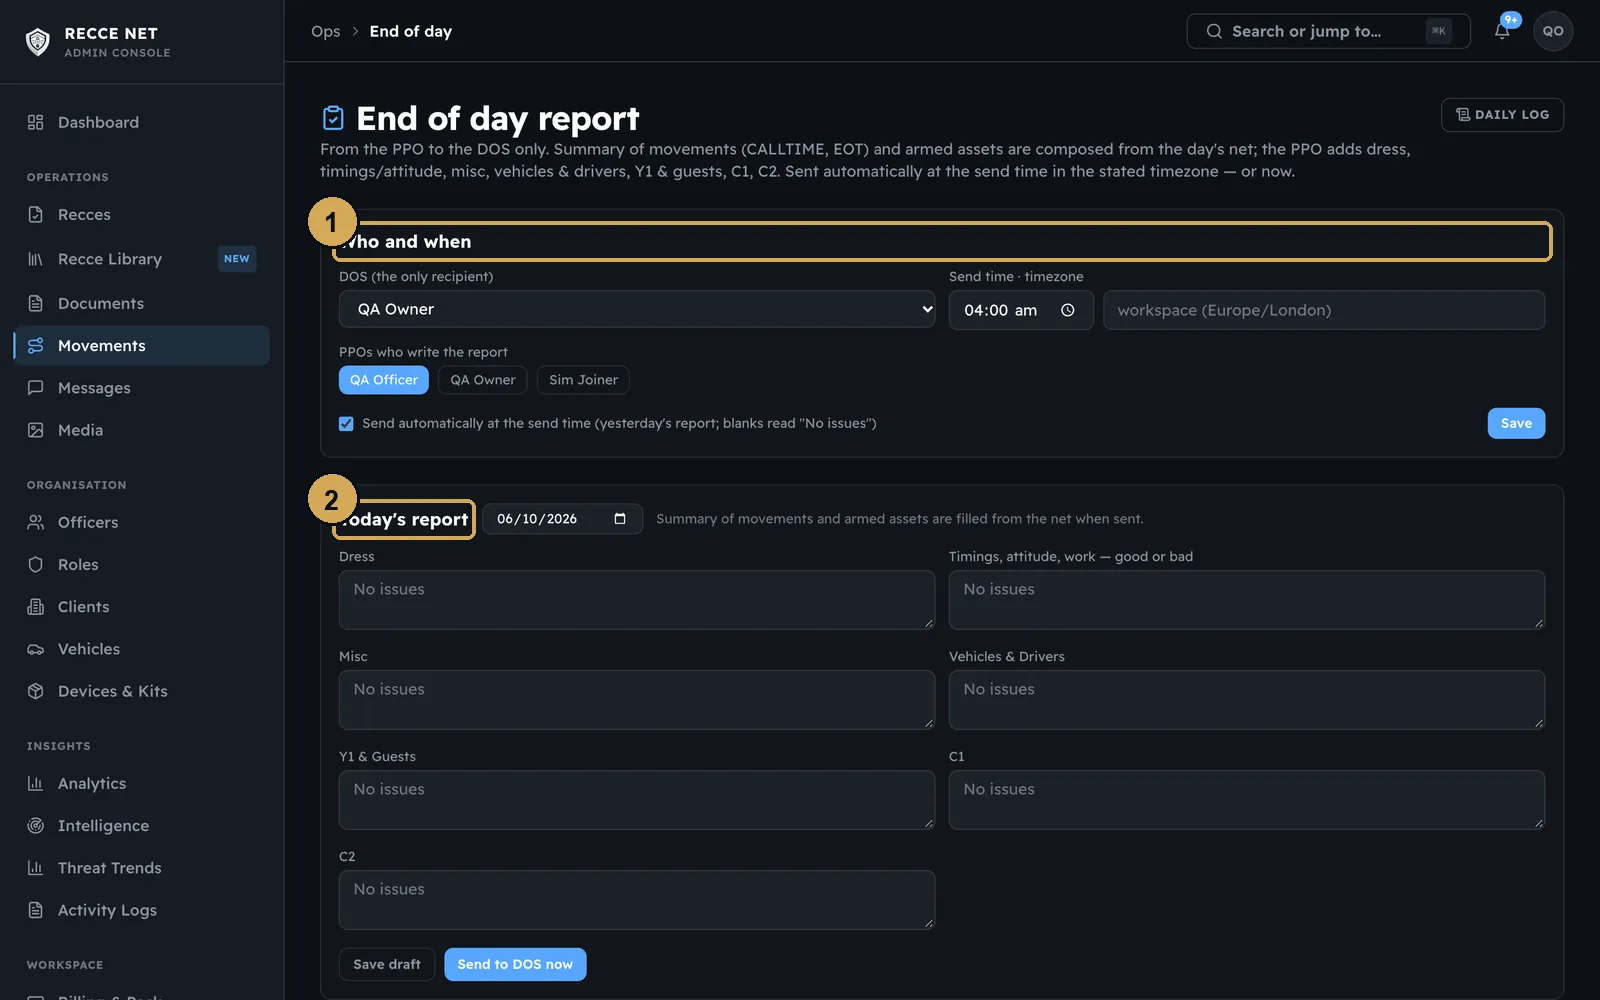
The end of day report goes from the PPO to the DOS, with one box for each heading. The day’s movements are filled in from the log when it is sent. In the console, choose who writes the report and who receives it.
 (opens the full-size screenshot)
Choose who writes the end of day report and who receives it.
- 1: Who writes it, who gets it
- 2: Today's report
Reviewing recces
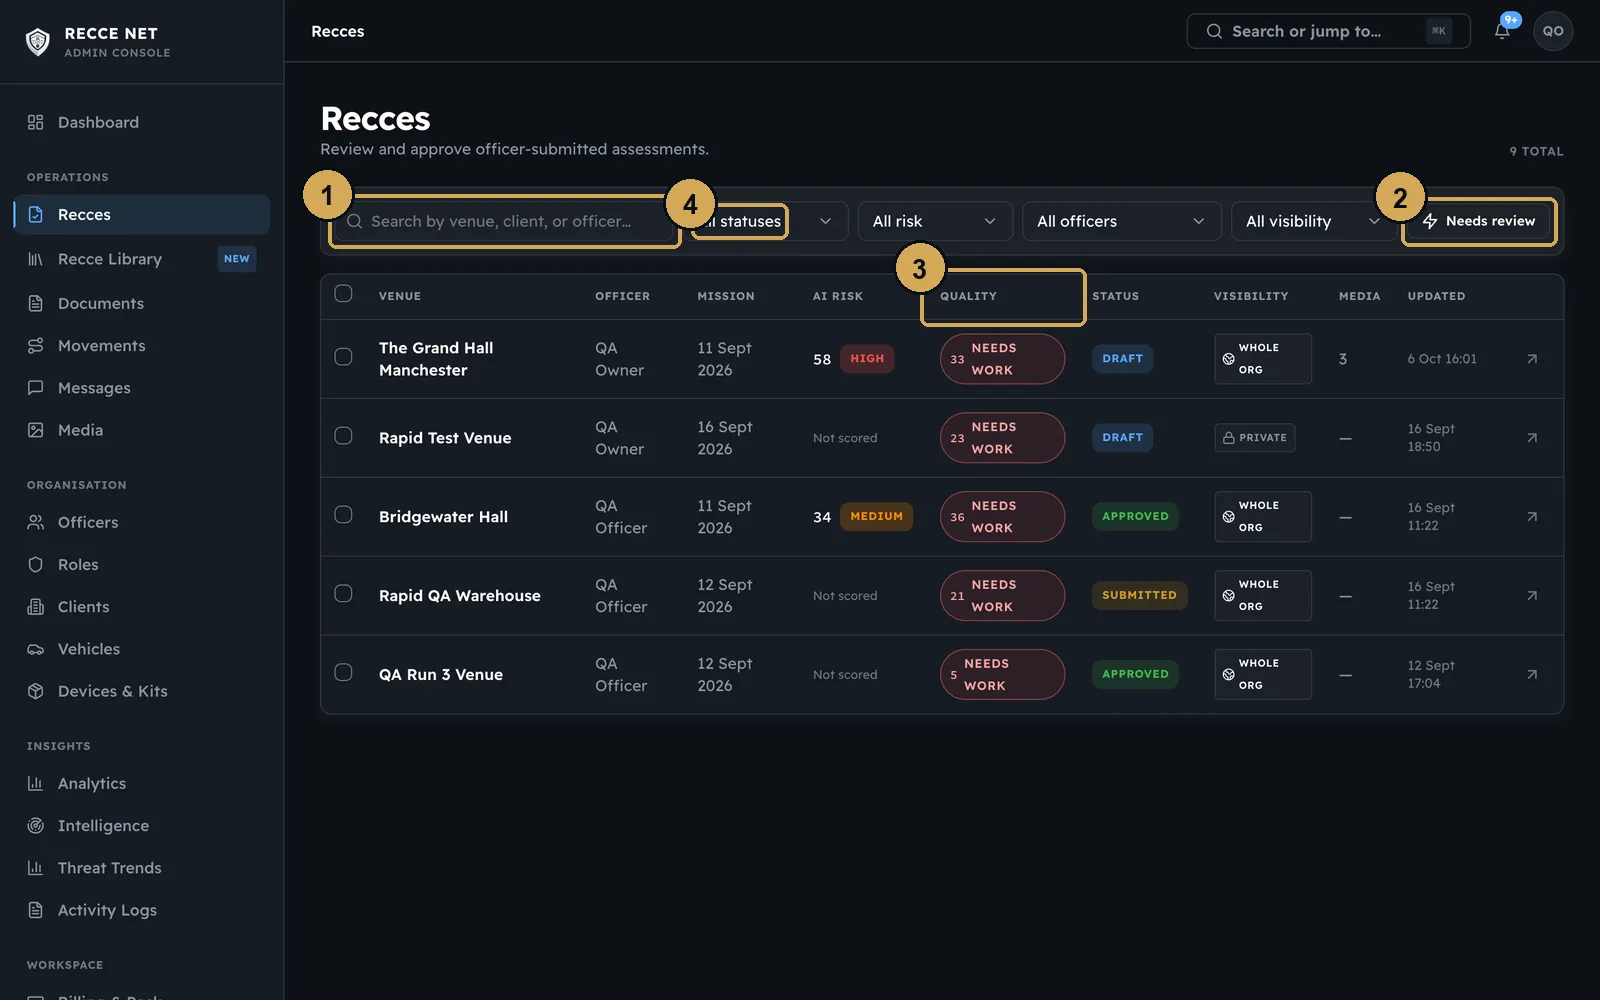
Recces in the console lists every recce in the workspace, with its officer, AI risk, quality score and status. Filter it to show only the ones waiting for your review.
 (opens the full-size screenshot)
Every recce in the workspace. Filter to what needs your review.
- 1: Search and filters
- 2: Show only what needs review
- 3: Quality score
- 4: Status
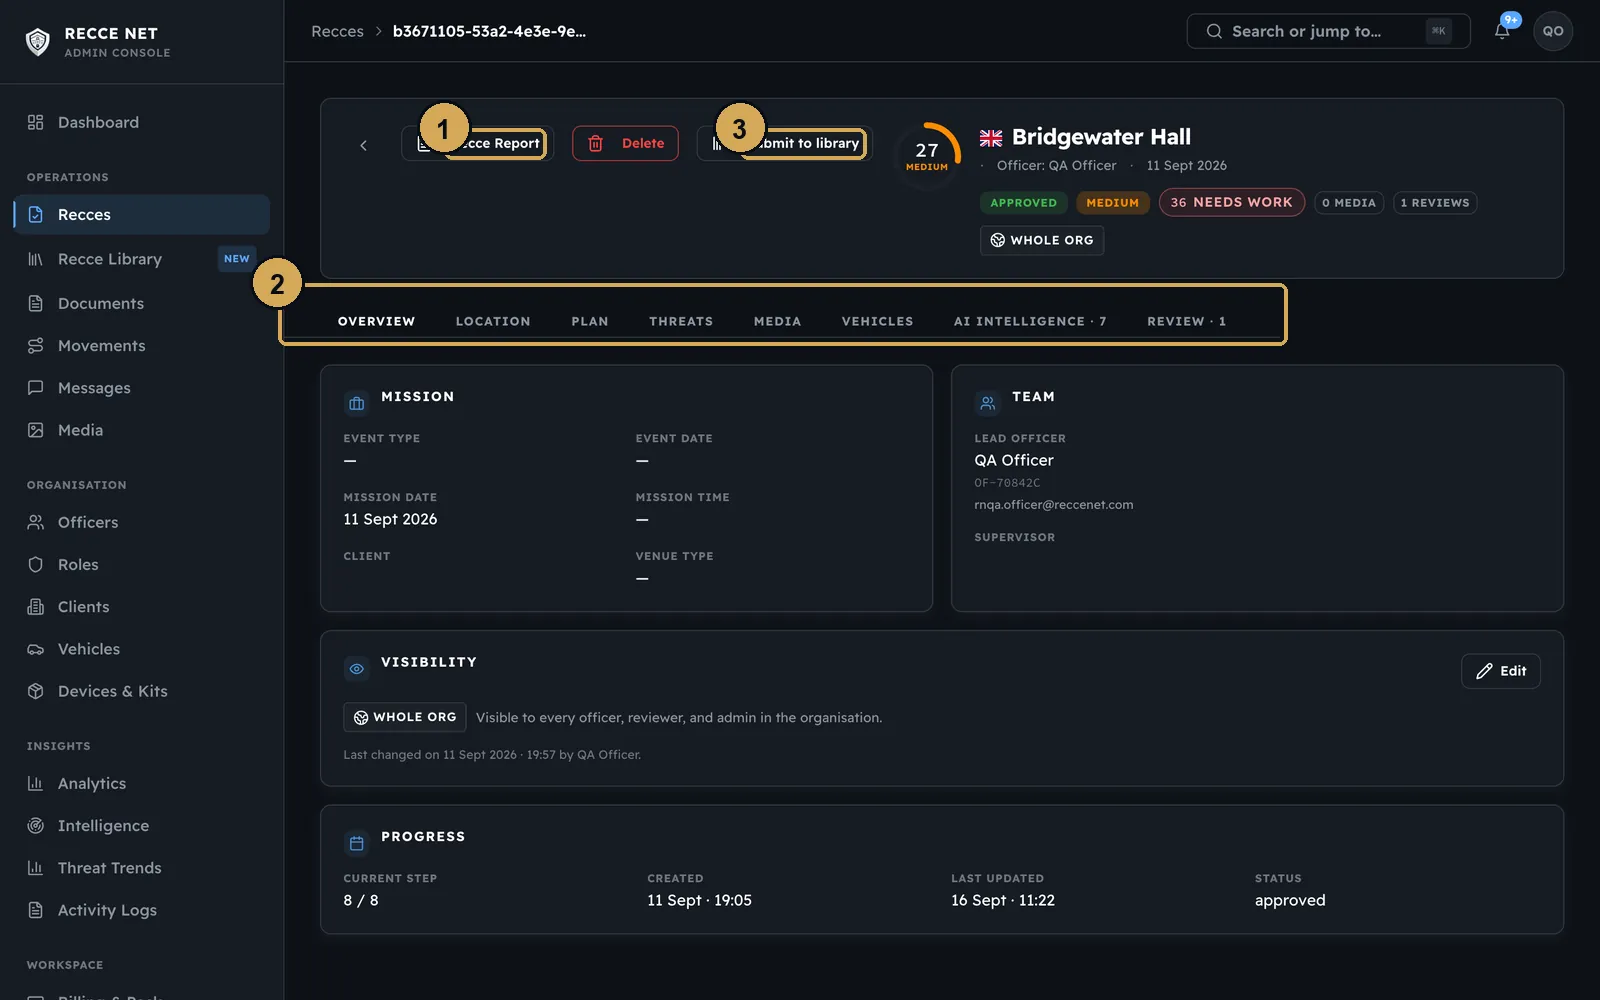
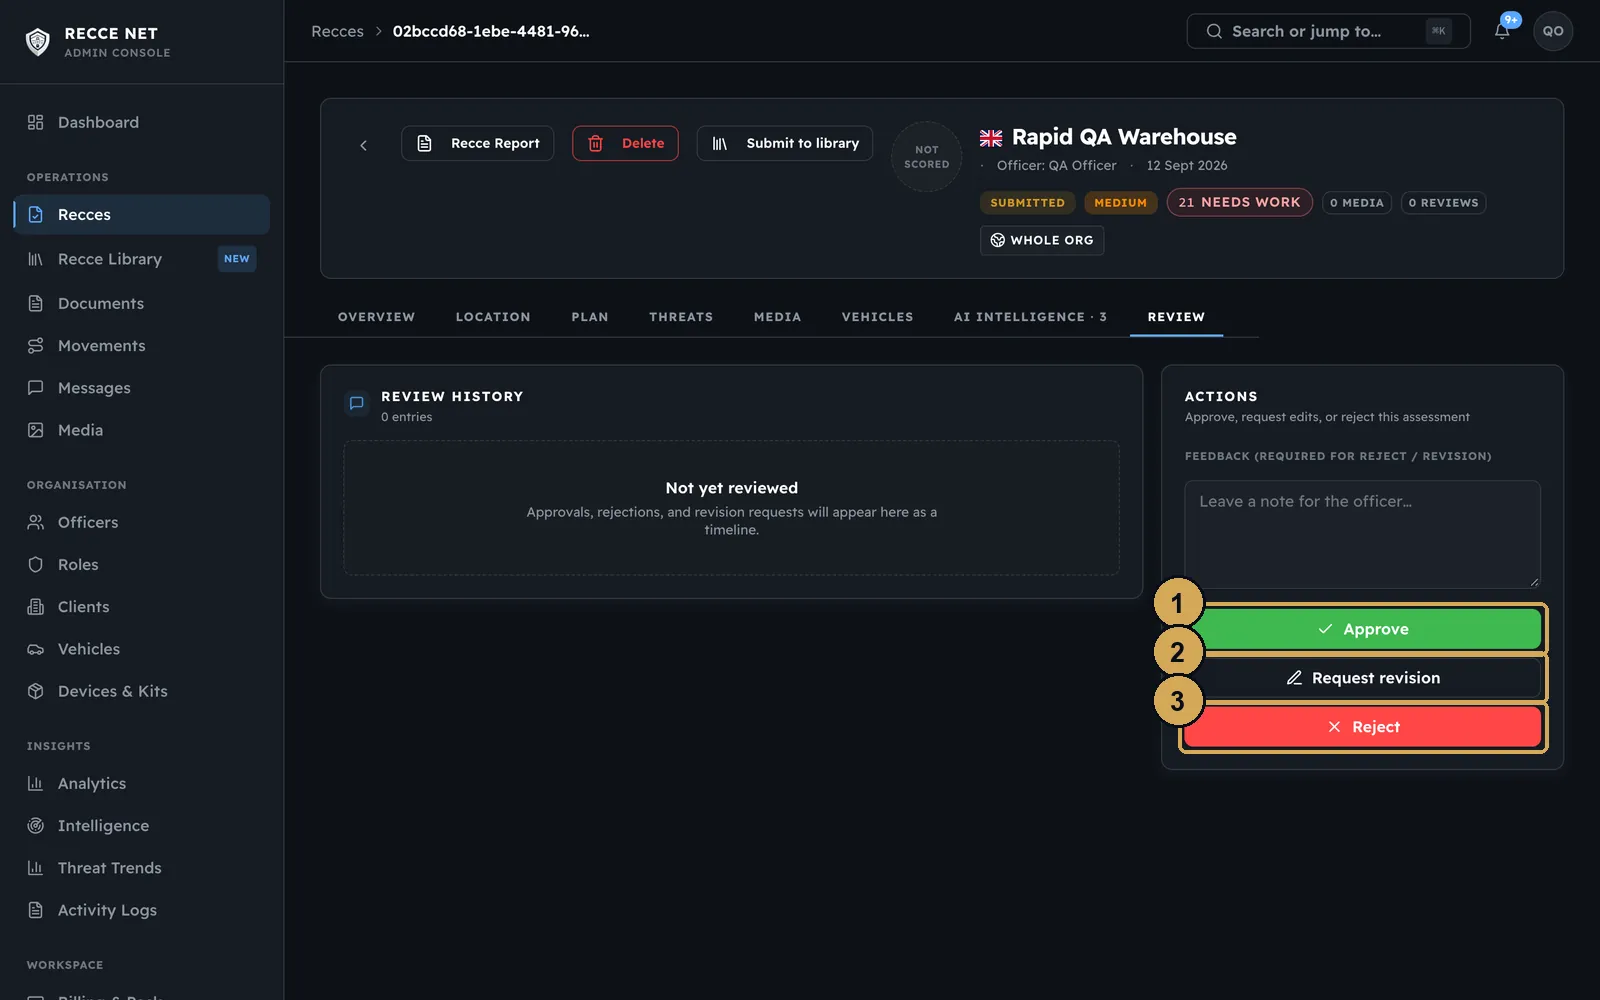
Open a recce and work through its tabs. On the Review tab, approve it, send it back for a revision, or reject it. A rejection needs a reason. Approved recces can be shared to the Recce Library. The report is drawn straight from the recce, with its own reference number, and is ready to print or save as a PDF.
 (opens the full-size screenshot)
One recce: the tabs a reviewer works through, the report and sharing to the Library.
- 1: Open the report
- 2: Tabs a reviewer works through
- 3: Share to the Recce Library
 (opens the full-size screenshot)
Approve, send back for a revision, or reject with a reason.
- 1: Approve
- 2: Send back for a revision
- 3: Reject (a reason is required)
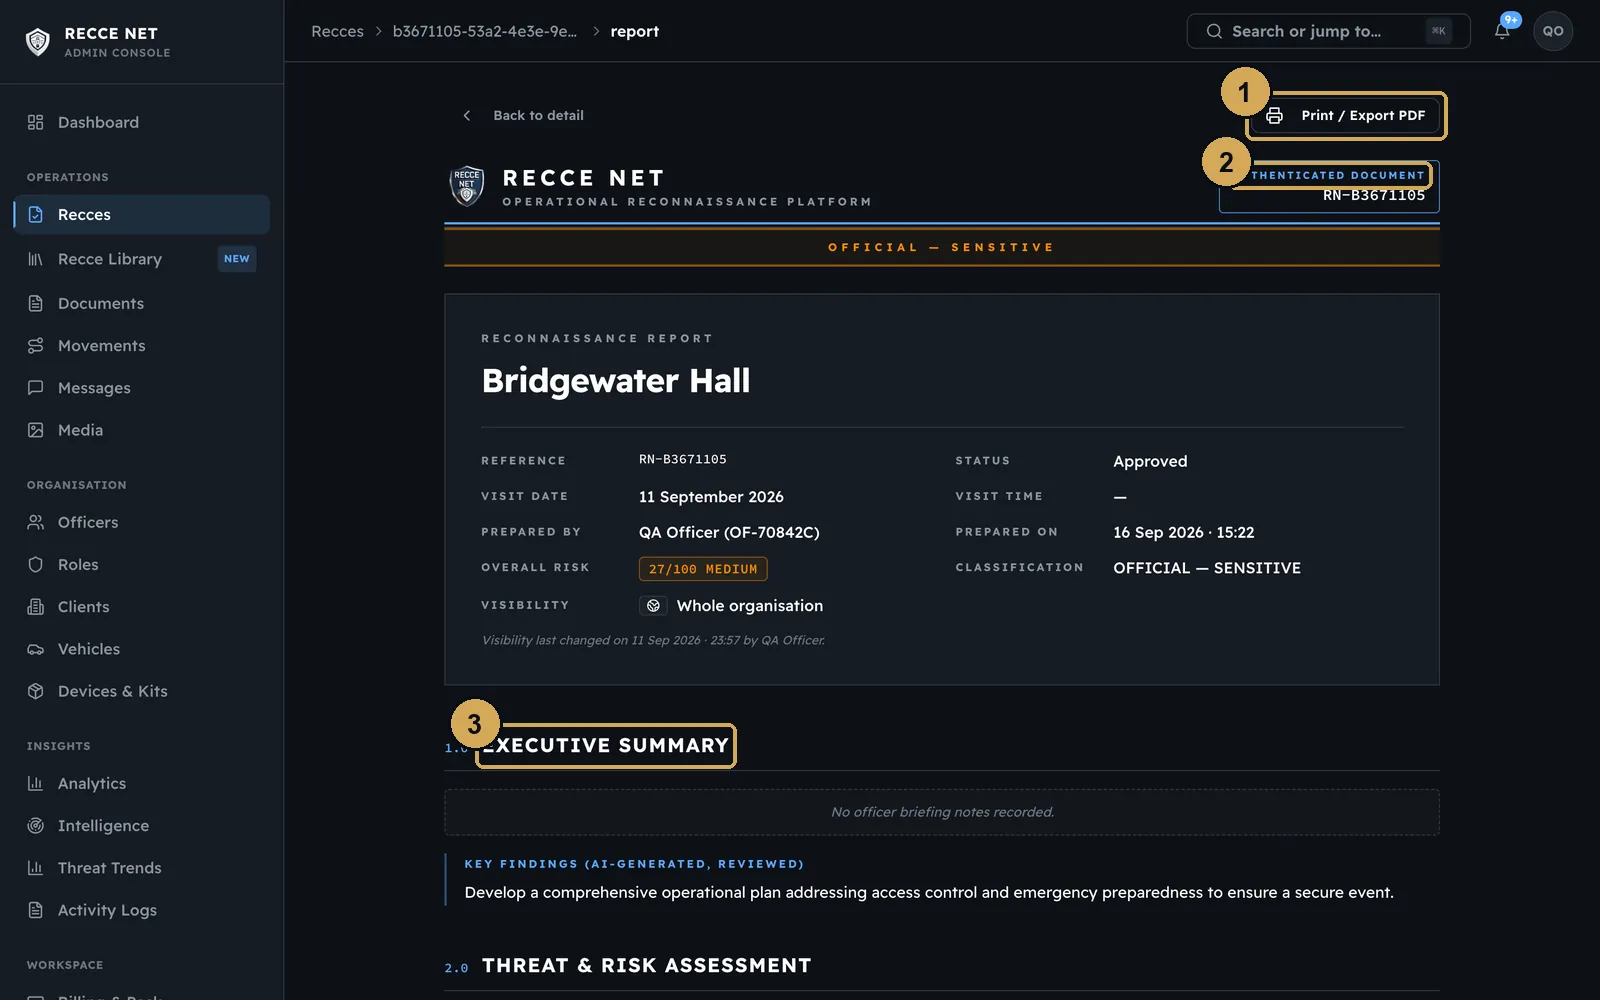 (opens the full-size screenshot)
The report, drawn from the recce, ready to print or save as a PDF.
- 1: Print or save as PDF
- 2: Unique report reference
- 3: Numbered report sections
Console tour
The console at admin.reccenet.com is where a team is run. We have covered Officers, Seats and Billing and Documents above. These pages complete the tour.
Dashboard
Your home page in the console: a getting-started checklist, the recces waiting for you and the latest officer activity.
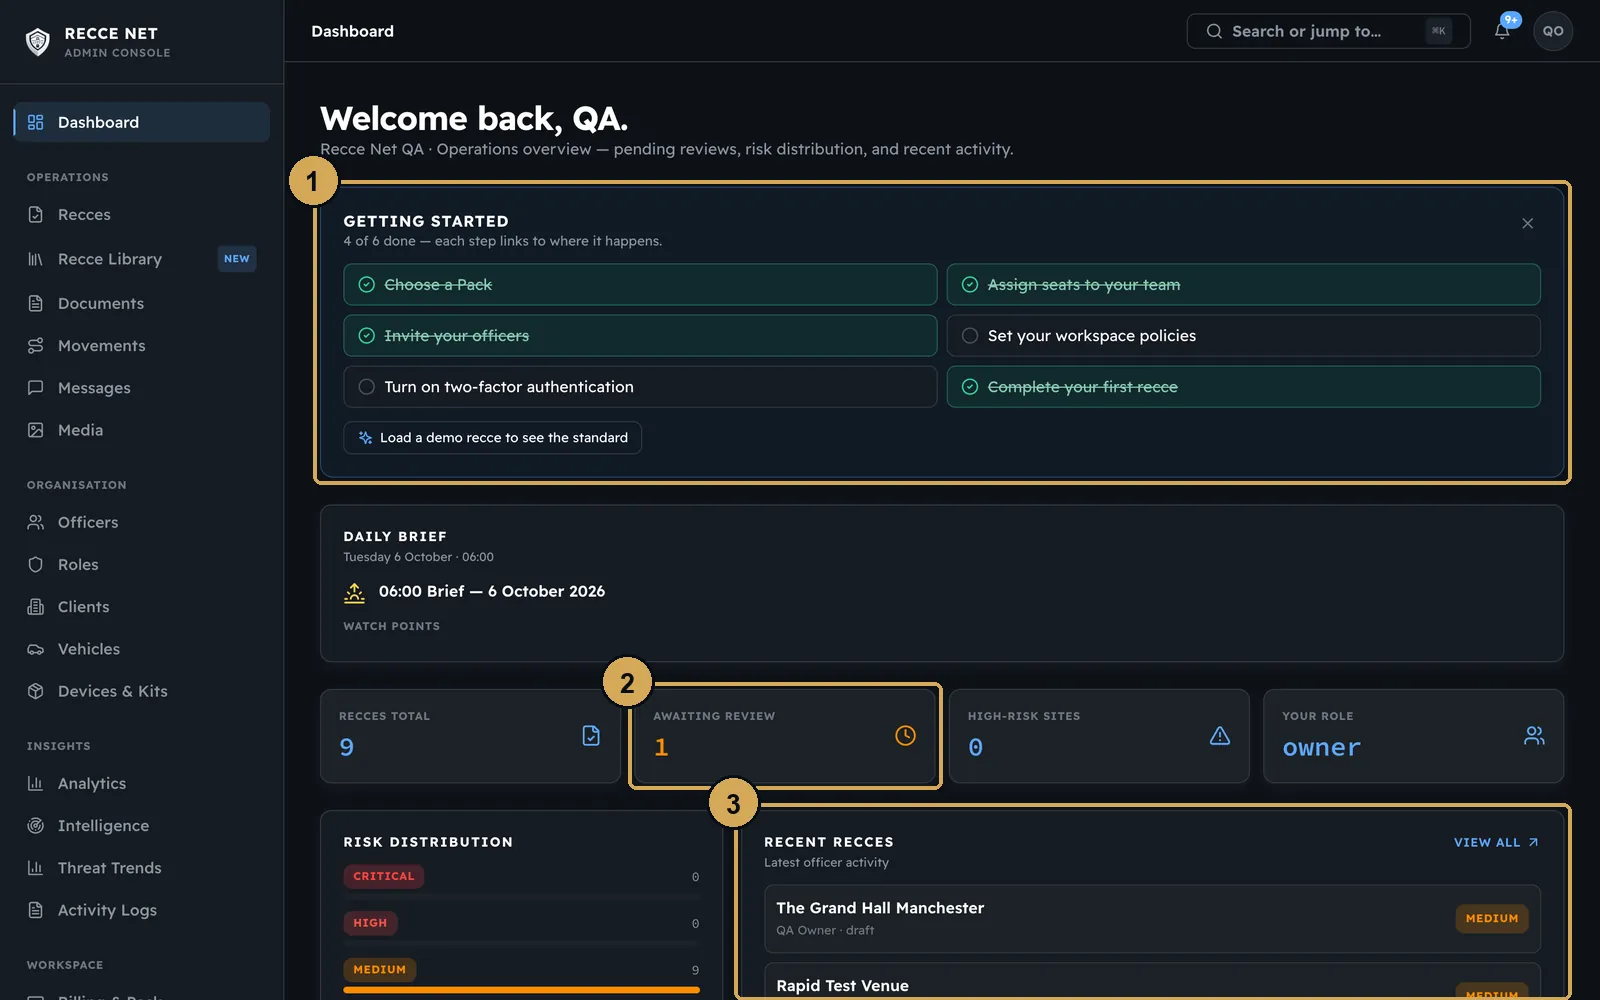 (opens the full-size screenshot)
The console dashboard: the checklist, what is waiting for you and the latest activity.
- 1: Getting-started checklist
- 2: Recces waiting for you
- 3: Latest officer activity
Recce Library
Approved recces from your workspace, recces your crew has shared and the public venue library, on a map. Use Import past recces to bring in reports from before Recce Net.
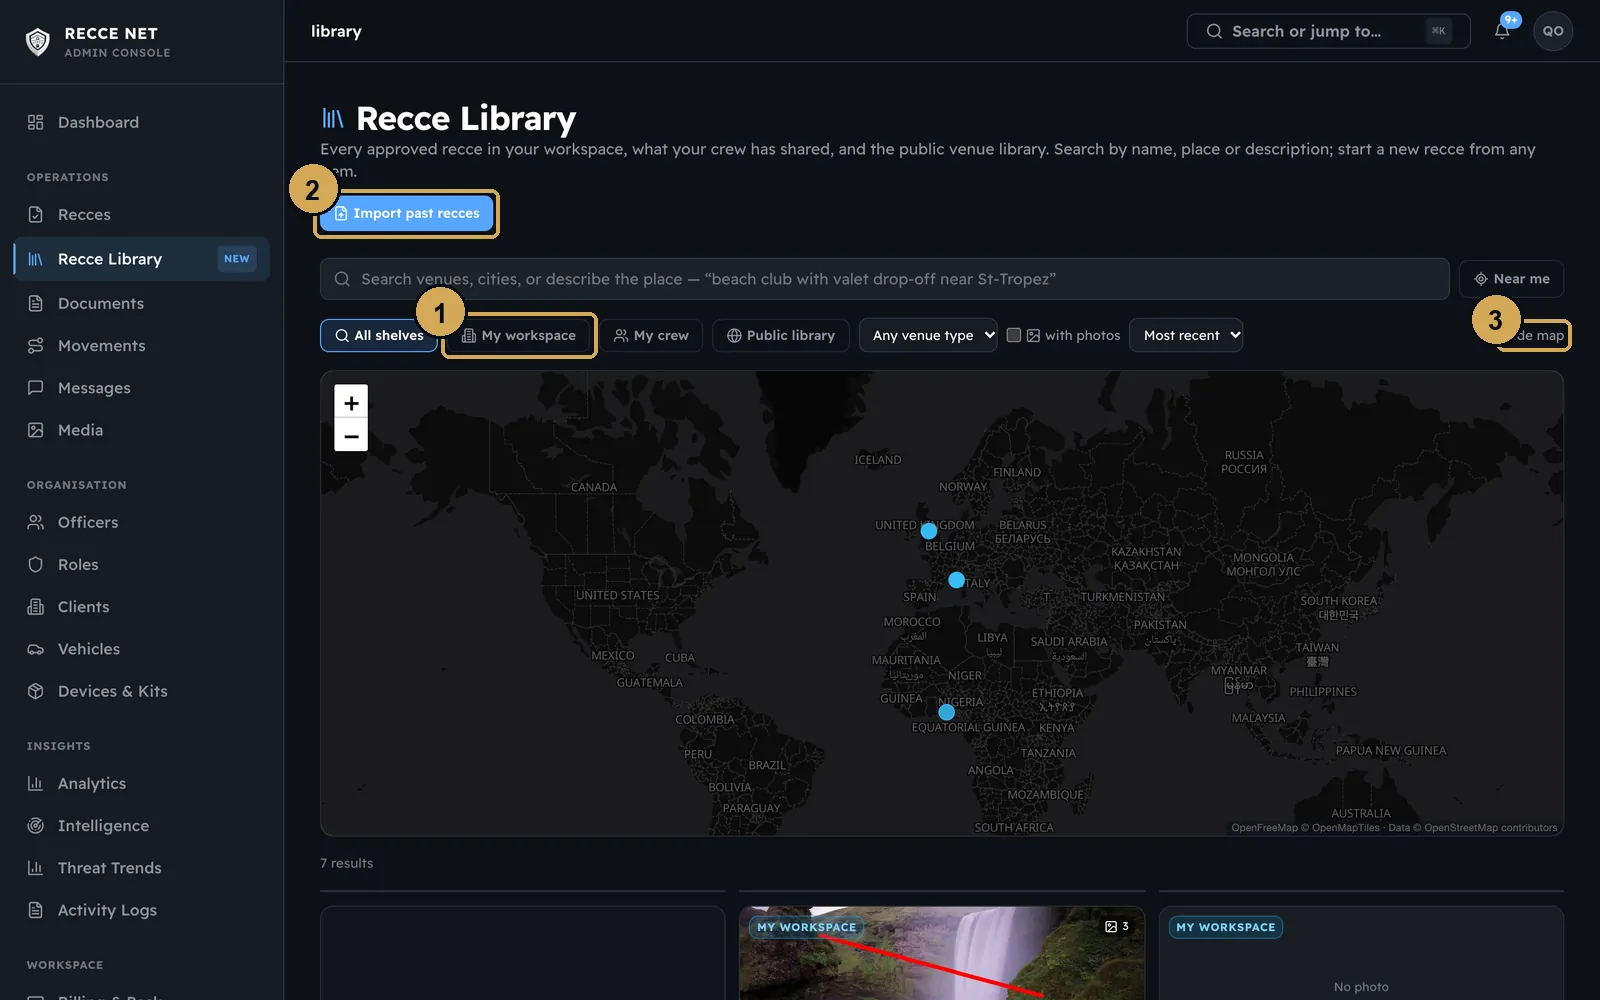 (opens the full-size screenshot)
The Recce Library: approved recces as templates, and past reports imported.
- 1: Shelves
- 2: Import past reports
- 3: Map view
Devices & Kits
The kit register shows who holds what. Add kit and set your own categories in the console. Supervisors can assign, reassign and return kit from the Team tab in the app, and operators accept hand-overs on their phones.
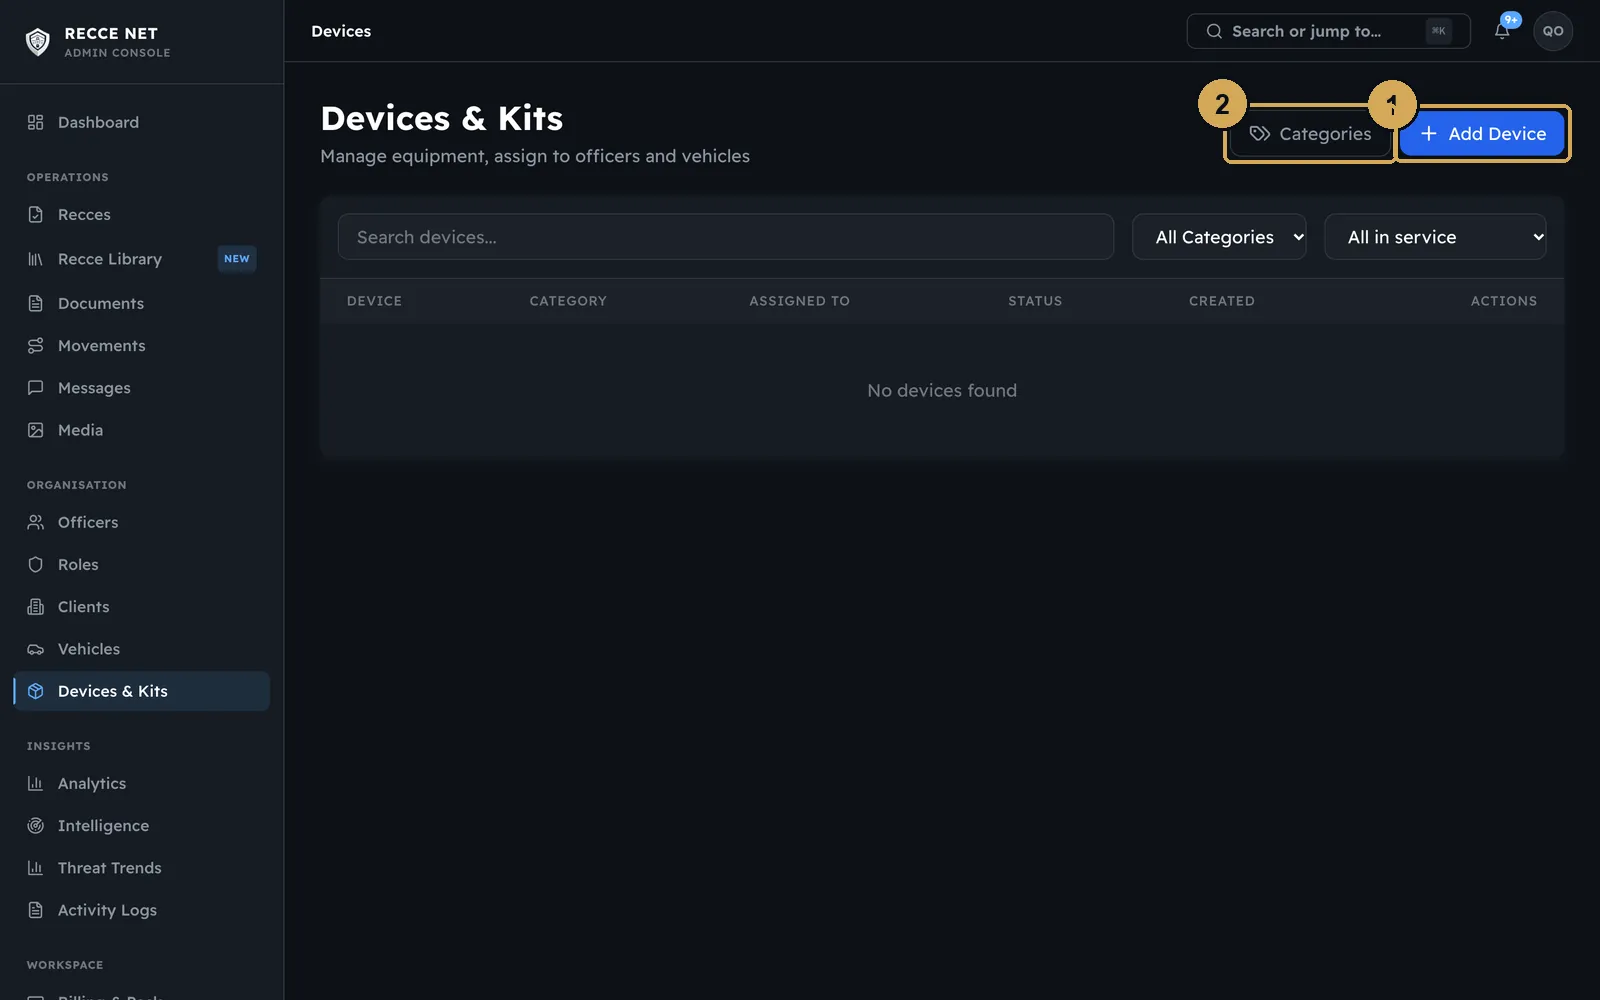 (opens the full-size screenshot)
The kit register: add kit and set your own categories.
- 1: Add kit
- 2: Categories
 (opens the full-size screenshot)
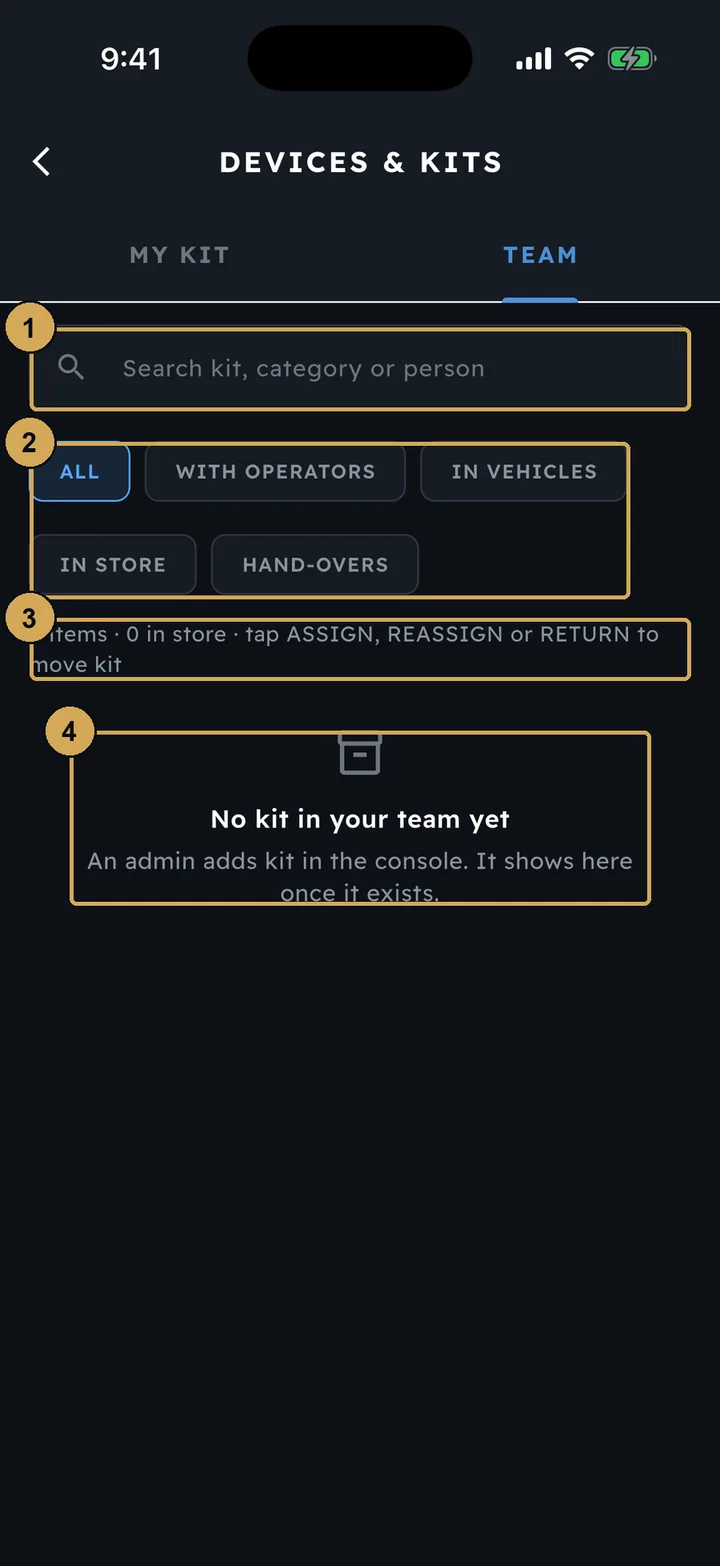
Supervisors assign, reassign and return kit from the Team tab (empty in our demo).
- 1: Search kit, category or person
- 2: Filter: with operators, in vehicles, in store, hand-overs
- 3: Assign, reassign or return kit
- 4: Kit is added by an admin in the console
Analytics and Activity Logs
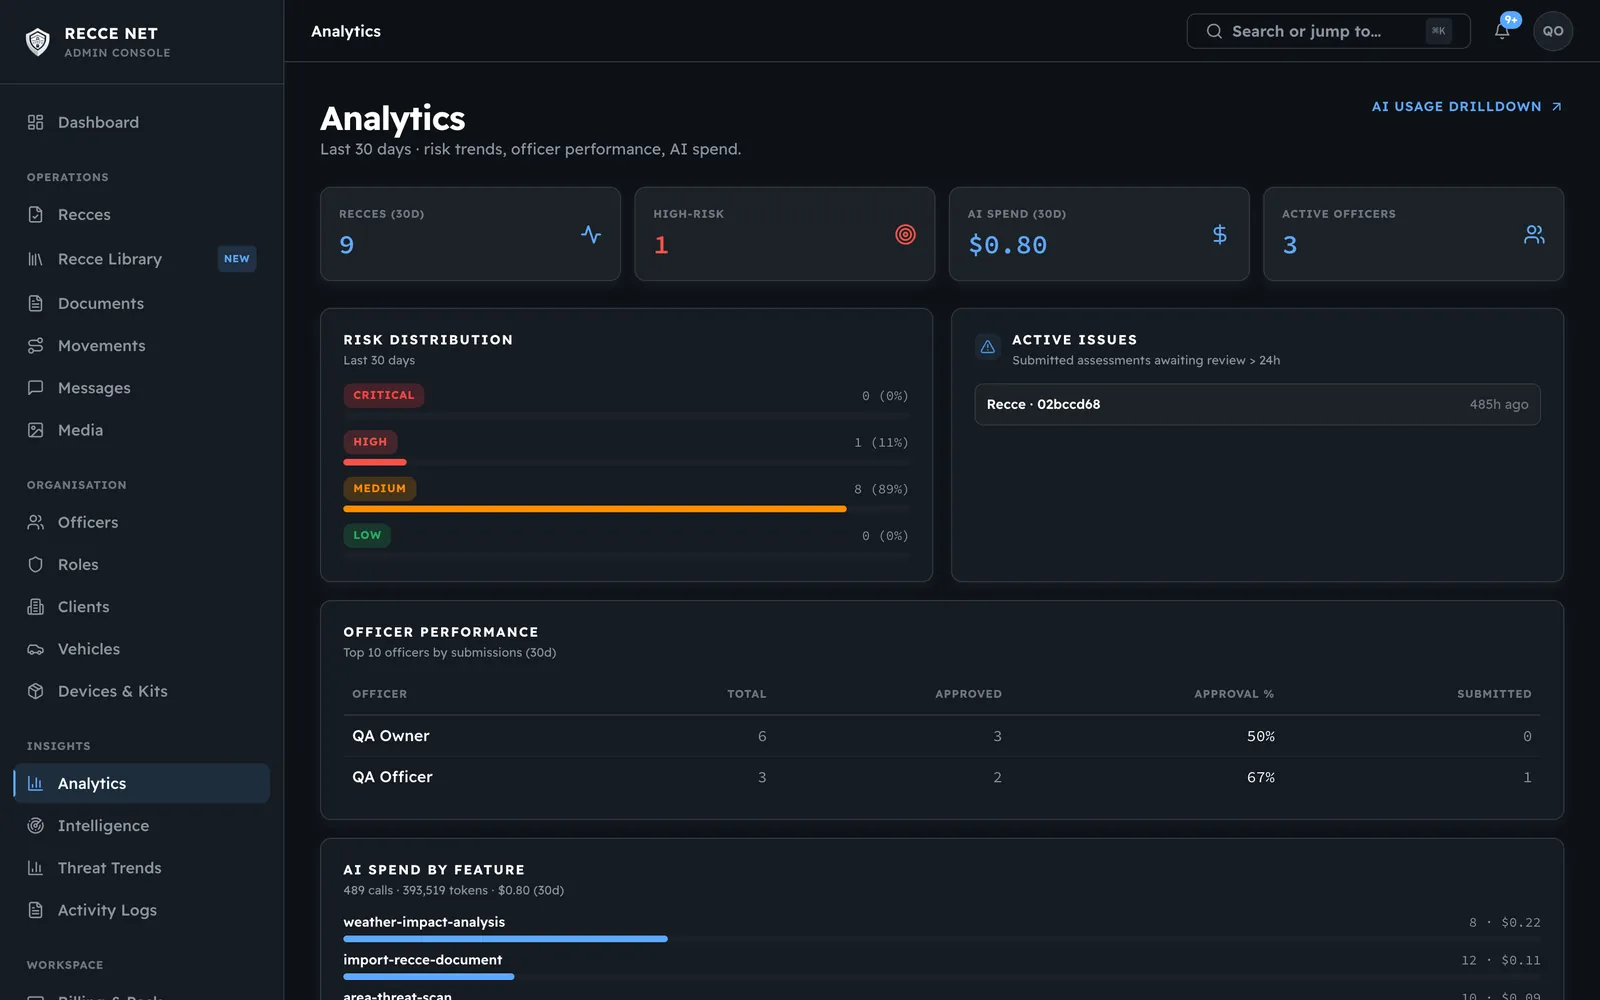
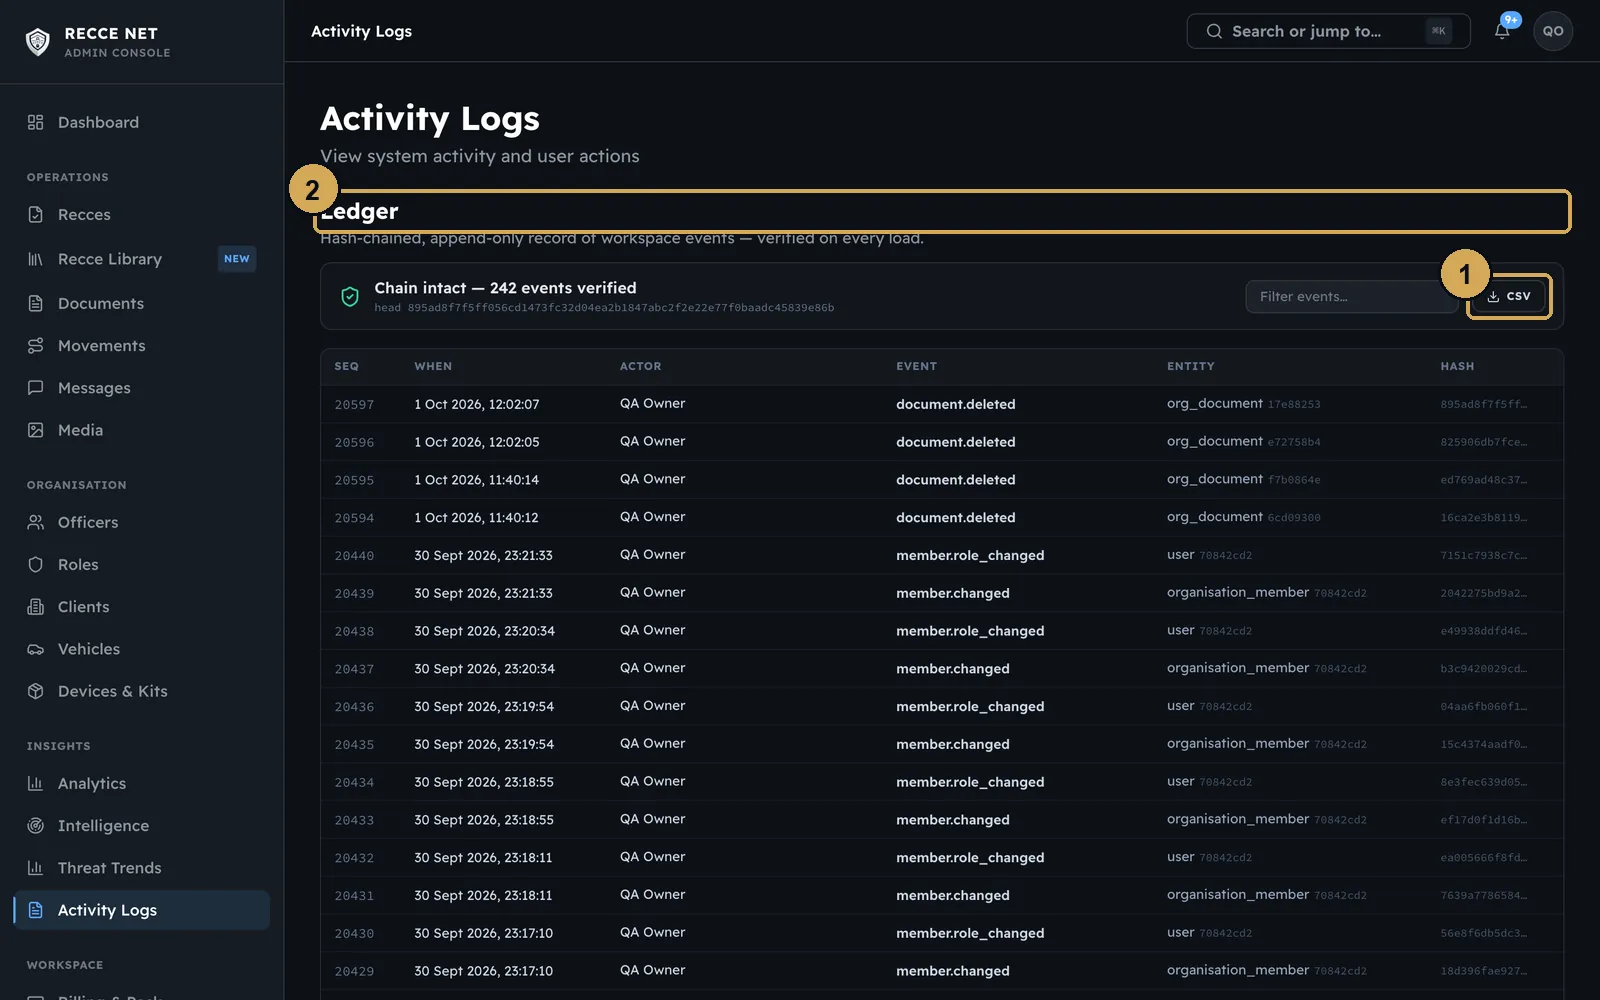
Analytics gives a snapshot of the workspace: risk distribution, recces over time, high-risk sites and officers. Activity Logs is a tamper-evident audit trail of approvals, verifications and changes, which you can export as a CSV.
 (opens the full-size screenshot)
Analytics: a snapshot of your workspace’s recces and risk.
 (opens the full-size screenshot)
The audit trail of approvals, verifications and changes, exportable as CSV.
- 1: Export CSV
- 2: Tamper-evident ledger
Help centre
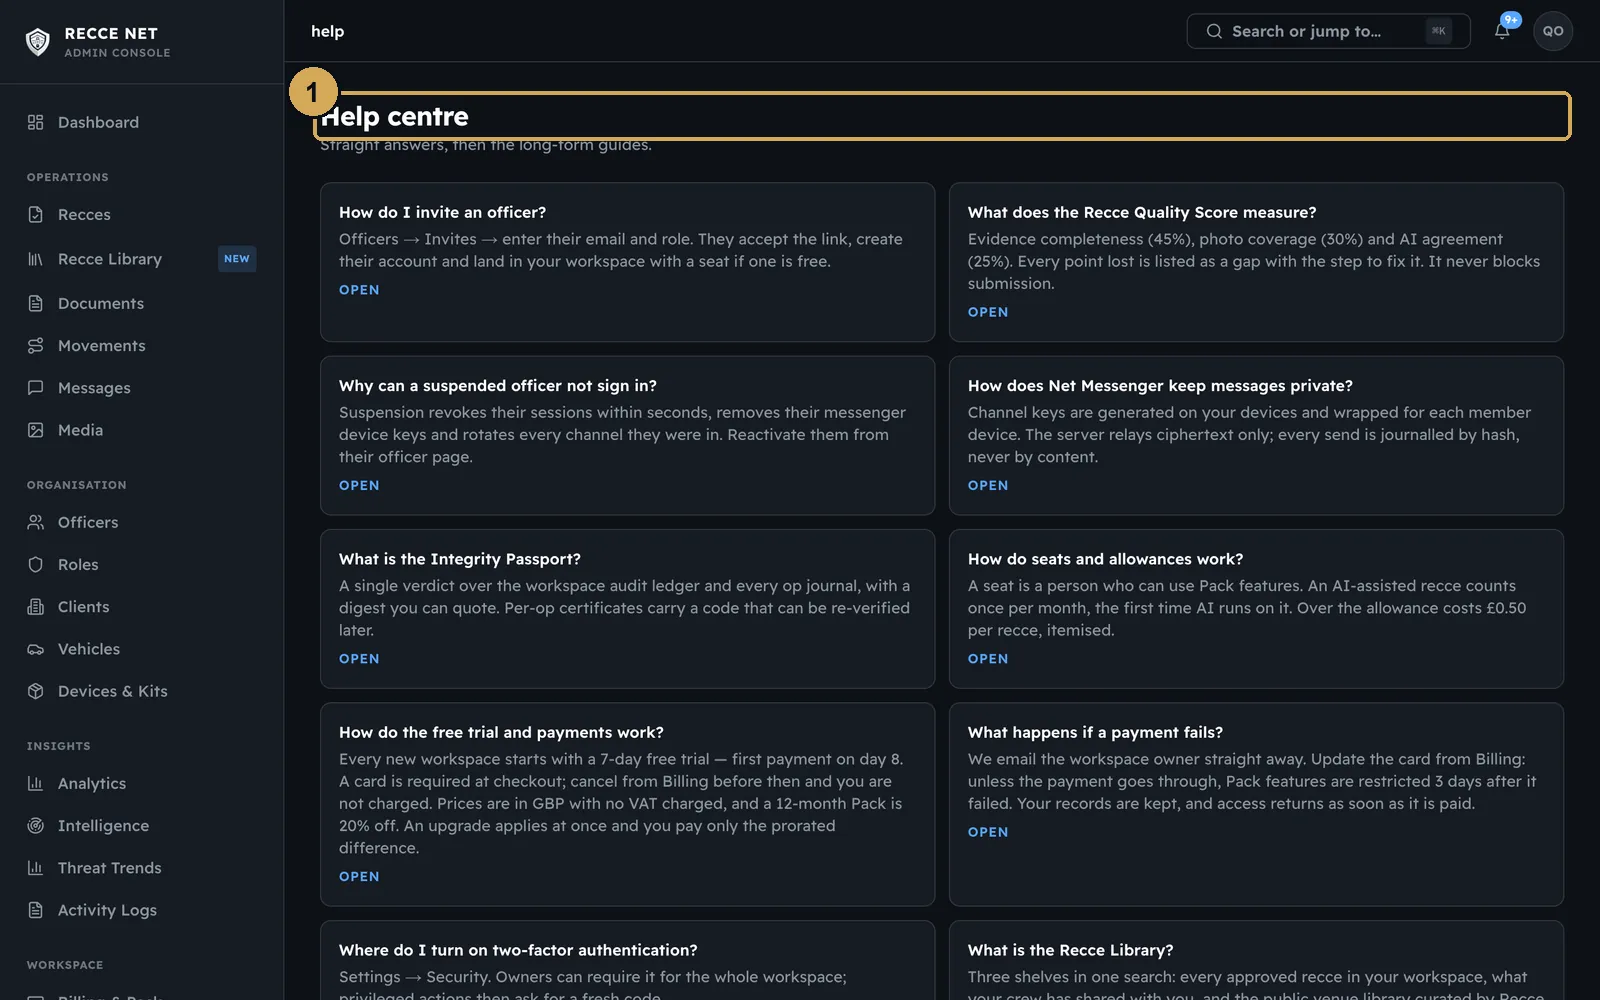
Answers to the common questions, each linked to the page where that thing happens.
 (opens the full-size screenshot)
The Help centre answers the common questions and links to the right page.
- 1: Help centre
Need a hand?
Email help@reccenet.com with the recce or officer ID. Most “what happened?” questions are answered in Activity Logs.